No. 184: MoPac Howe Truss Box Car, and the Generosity of Old Friends

Three weeks ago I got an e-mail from an old friend, telling me to expect a box in the mail. He didn’t provide any details. He just said “I’m sending you a box of goodies.”

I do a lot of model and parts swapping with other guys, so much so that getting a box of swapped goodies a month is a regular thing. But this box was different. It wasn’t a box of cut-up decals or leftover resin parts, or somebody’s leftovers. This box included two beautifully finished HO scale models, with a note that said “These models are a blessing from Bill Welch”. Wow.

The car above is a Sunshine ATSF GA-49 gondola. I’d never seen one before I opened the box. It’s an awesome car and it immediately became one of my favorite models. Below is another Sunshine car, this one a rarity–an N&W G-1 low-side gondola.

In the 15 or so years I ran St. Louis RPM, I learned that our hobby is full of very, very generous people. People who are generous with their time, and their hard work, and their money. People willing to share everything they’ve got. I was humbled then, and I’m again humbled today. These models are indeed a blessing.

Here is another new model received at about the same time, below. This is one of the new Rapido UTLX X-3 8,000-gal tank cars. It is gorgeous. I’m working on it this week, adding placards, new trucks, and a few more things to really sweeten it up. Well done, Rapido!

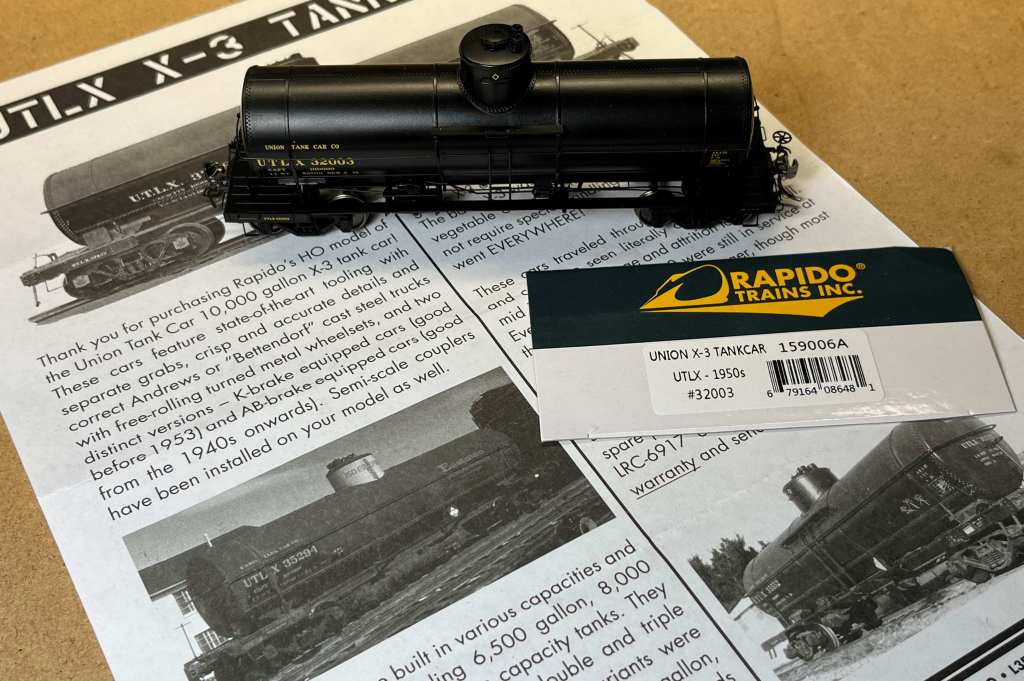
Our old friend Richard Hendrickson campaigned for a high-quality, injection-molded model of the X-3 for decades. If he were around today, I think he’d be well-pleased with this model.

MoPac How Truss Box Car

I wrote last fall that I was working on about 14 new HO scale models. Most of them are still in various stages of completion; this one–a Sunshine MoPac single-sheathed box car–was finally finished in March. Here’s the story.

According to Ed Hawkins, Missouri Pacific rostered over 4,000 1924-design Howe-truss single-sheathed box cars. I like single-sheathed cars, and given those high fleet numbers I feel that I can justify one on my railroad. I bought this old kit from my friend Tim O’Connor last year and built the car last fall and finished paint and weathering right about the time I received the other models mentioned above.

Below. There’s nothin’ like opening up a box of Sunshine Models goodness!

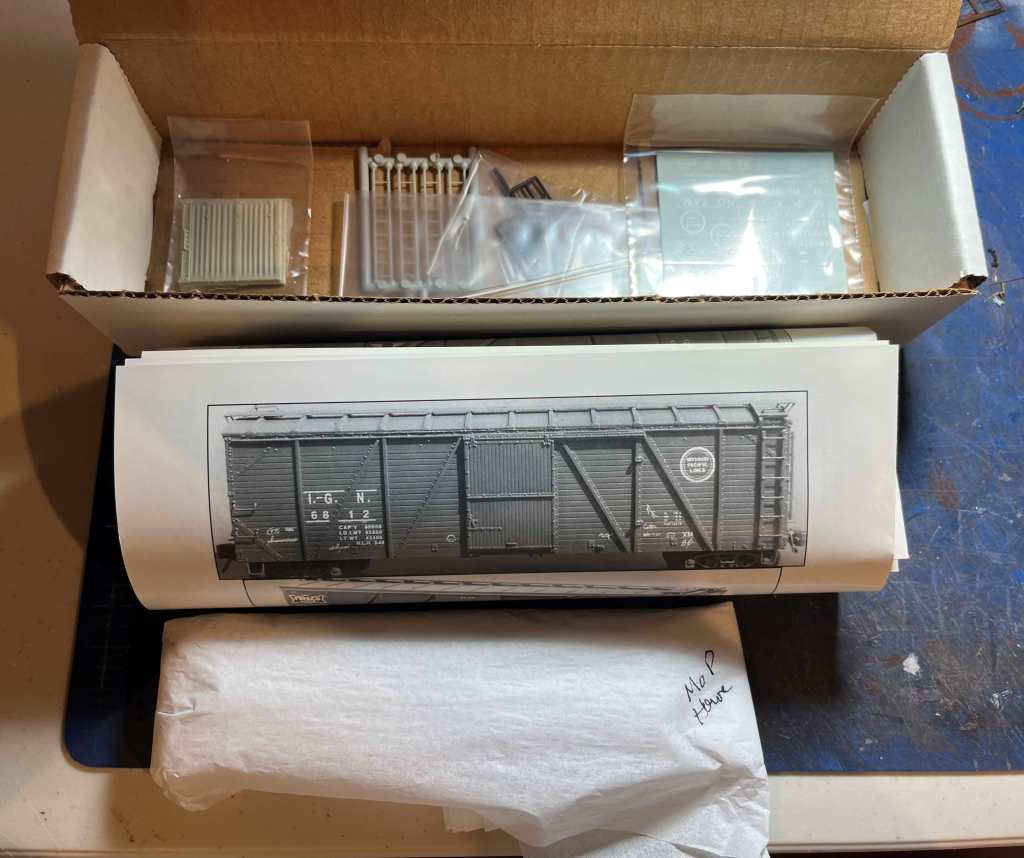
Here’s the prototype car. This is a Joe Collias photo from the early 1950s. Classic MoPac. The Sunshine car is a perfect replica.

Below. I began the build with the underframe, since that’s my least favorite stage of assembly. Below, I’ve followed the instructions and placed the valve and reservoir based on prototype photos included with the kit. I prefer to use Cal Scale brake gear but didn’t have the entire set on hand, and had to use a Tichy reservoir instead.

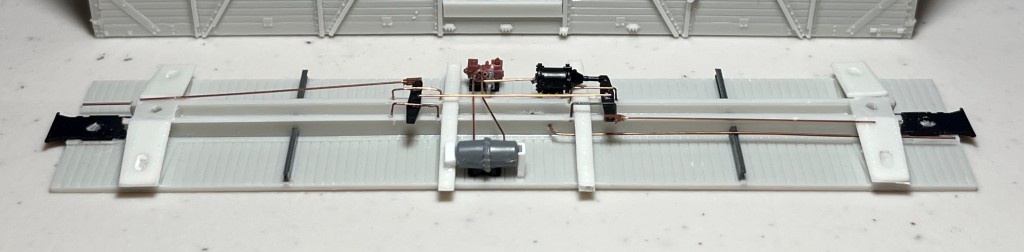
I connected the chain to the clevis at the cylinder piston using a short, .0125-inch piece of u-shaped wire. That allowed me to make an easy connection to the piston. Credit for that technique goes to Jerry Hamsmith.

Below. Here’s a photo of the completed underframe. I forgot to photograph it during assembly; here’s a view after the car was completed. This view also shows that I used Kadee #178 coupler boxes on the model, and Tahoe 40-ton trucks, and Hi Tech air hoses with brass brackets. It also appears that I used two different brands of “Code 88” wheelsets–see how the truck on the left has wheelsets polished to silver, and the one of the right has wheelsets polished to some other color??

You can also see that I tested using an artist’s pencil on the bottom of the weathered underframe. The lighter boards are where I tested a dark red pencil before I used it to weather around the rest of the model.

The superstructure was finished next. First I sanded the sides and ends the same height and length, to make sure the model makes a perfect box, and then added ladders, grabs and sill steps on the car sides. The roof has a running board made from Evergreen styrene, although I used the lateral running boards that originally came with the model. The A end was simple to finish–just ladders, a few grabs and a tack board and that was about it.

The last assembly completed was the B end. I finished the model per the instructions and used the prototype photo included in the instructions as an additional guide. The ladders are old Details West parts included int he kit. The air line attachment is a brass Hi-Tech details part. The sill steps are by A-Line, and the running board supports are by Yarmouth. It was a straightforward build; fairly easy since attaching a “stemwinder” brake wheel usually goes a lot faster than a power brake housing.

When construction was complete I sandblasted the model in my North Coast sandblast booth, and after I washed it and set it aside to dry, I painted it with Tru Color MoPac Freight Car Red.

I applied the kit-supplied decals in my usual manner, using Microscale Micro-Sol during application, and once dry using Walthers Solvaset to snuggle the decals around the details.

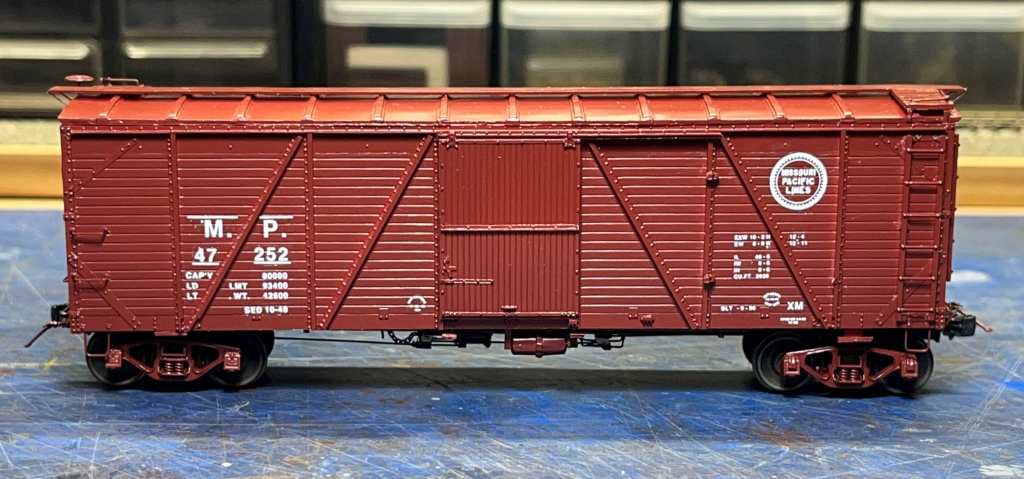
After a few applications of Walthers Solvaset to make sure the decals settled nicely, I sealed the finish with two coats of a mix of 50% Testors Dullcote, 25% Testors Glosscote and 25% paint thinner to set the decals.

Once the Dullcote was dry, I mixed a solution of black artist’s oil paint and paint thinner and dribbled it on each surface of the car (roof, sides, ends, and trucks) and allowed that to dry. That solution, which I’ve described frequently on this site, allows the black paint to settled in around the details and between the side sheathing boards, creating a dirty, well-used appearance. I also added a little more black weathering on the roof, this time carefully brushing on some AIM “Soot” weathering powder. Finally I colored some of the boards with a dark red, almost maroon artist’s pencil I mentioned earlier to highlight some of the sheathing boards. Then I sealed everything with one more shot of the Dullcote mix.

The last step was fixing the completed, weathered underframe to the superstructure. After a quick re-check on operating quality (coupler height, truck swivel, no wheel binds, etc.) the model was declared ready for service. This was a very enjoyable build and this one is definitely a keeper.

Looks like I need to untangle that chain!

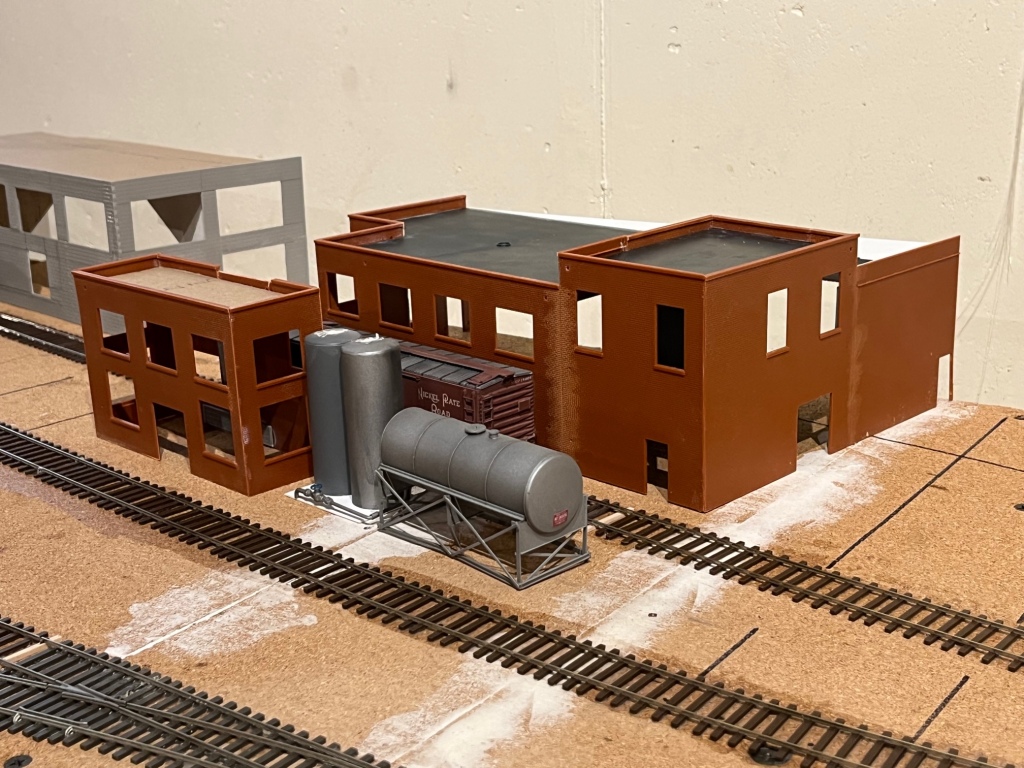
Meanwhile, progress on the new Hermitage Road layout is progressing nicely. This week I finished a new version of the Alcatraz Paint and Varnish Co., using a Walthers locomotive shop kit. Here’s the model, and I’ll explain how I did it in a later post.

Hope you all enjoy your weekend. – John G

No. 176: Move-In and New Freight Car Work

Our major shipment of “household goods” arrived from Germany last Friday. My wife and I have spent most of our waking hours putting the house together. It has been A LOT of work.

Included in our household goods was my Hermitage Road layout, the traversing table, five metal cabinets and bookcases, and about 25 plastic tote boxes with model kits and supplies of all kinds. Almost everything arrived unscathed, thankfully. The Hermitage Road layout took a beating so I’ll have to assess whether to try and repair or start over. More to follow on that later.

Here is a photo of two of the cabinets. The packers in Germany simply wrapped up these two items with everything still in the cabinets, and didn’t put any packing material in there to keep the boxes in place. I was watching them but didn’t notice that detail. When we arrived in Illinois and the packing was removed, this is what happened.

The cabinet on the left is what I called “The $20,000 Cabinet” because there were over 200 finished resin models and locomotives in those white boxes. That cabinet also included about 8-10 cardboard parts boxes, several of which “blew up” in transit and spewed parts everywhere. The bookshelf on the right contained book binders and parts boxes, and everything on that arrived in a shambles. When the wrapping was removed parts and magazines and stuff were fell out all over the floor.

I took a lot of care to pack everything else except these couple of cabinets. I think I got really lucky. Obviously, these cabinets were turned upside down at some point. The real heroes here are those white car boxes–they’ve protected models for 30 years and 11 moves and they still soldier on.

A few days later the cabinets had been cleaned and rebuilt (see below). The cars on top are O Scale (Proto48).

My old workbench that I built at Travis AFB in 2002 got a new coat of paint and looks good as new:

We arrived back in Illinois on August 5th. We were able to move into our nice rental home the day we arrived, but we didn’t have any furniture and literally “camped” in it for nine weeks. Three weeks after we arrived we received a small, one-thousand pound shipment of “essential household items” which the military calls Unaccompanied Baggage. My Unaccompanied Baggage shipment also included five plastic totes filled with model kits, tools, and goodies. I told my wife the model boxes were essential for my mental health. Anyway, by August 20th I had everything I needed to set up a temporary workbench and start building models again. Here’s my temporary workbench:

I figured I had six to eight weeks to build up as many models as I could before our major shipment of household goods arrived, so I used what I had to my best advantage. I got a lot done, and I’ll do a short writeup on each car as it gets closer to completion. Here’s a run-down of the work completed.

Below. This is a new Rapido PRR Gla hopper model that I bought before leaving Germany. During the weathering process I really screwed up the finish, so I decided to sandblast it and complete it with Mount Vernon decals. I added new trucks, couplers, corner gussets, and a few wire details. Here it is awaiting paint and Mount Vernon decals.

Below. This is an Atlas 1932 ARA box car model I finished for an SCL Modeler article around 2009. I bought replacement doors from Speedwitch Media about five years ago and finally got around to installing them earlier this year. Along with the new doors I upgrade a bunch of details, but along the way I screwed up the original paint. I sandblasted the car and stored it for the move, and here it is, awaiting new paint and decals.

Below. This is an ancient Red Caboose CGW 1923 box car that I bought online as a decorated kit. My buddy Fenton Wells did one recently and motivated me to do one of my own. I was pleasantly surprised to find that the kit included the correct CGW reverse-Creco doors. Like, Wow! I used a huge number of aftermarket detail parts to upgrade the model, like A-Line stirrups, Cal Scale brake gear, Tahoe Model Works trucks, Hi-Tech brass hoses, and Kadee No. 178 couplers. I made my own running boards from Evergreen 2 x 6 strip styrene. All this car needs is paint touch up and weathering.

This car, below, is a CB&Q Flat Car by Jerry Hamsmith. Jerry sells these and other models independently; I think you can find them on the Resin Car Works site. It’s a nice resin kit with great castings and all the detail bits included, along with a nice decal set. I want to model this one with a lumber load to serve my Hermitage Road layout.

Below. This is an Intermountain 1937 Modified box car that will be finished as an Illinois Central 17000-17999 class car. which were delivered in 1939 from ACF. This model has a lot of after-market details applied, including Cal Scale AB brake gear, Yarmouth wood running boards with bronze support hardware, Yarmouth stirrups, Kadee grabs, Tahoe Double-truss trucks, Kadee scale couplers, and wire details all around. Looking at this picture I see I forgot to add the tow-hooks so I’ll have to go back and get that done.

Below. This resin car is one of the new Westerfield 1921 ARA C&NW box cars. It’s actually an old model, as Andrew Dahm used the original castings done by Frank Hodina for Sunshine Models 20 or more years ago. So it’s kind of a “Wester-shine” model. Andrew’s kit looks great and as a fun build. I finished this car with Cal Scale AB brakes, Yarmouth running board support, Tahoe Andrews trucks, Kadee scale couplers, Yarmouth stirrups and plenty of wire details all around. This is a cool car–very unique.

I bought this car from Bob Heninger just before I left Germany. This is an old Sunshine Missouri Pacific single-sheathed box car with Hutchins ends. It was a very straightforward build. It sure was nice to open up the box and see all that old Sunshine packing and everything. It made me a little nostalgic for the early 2000s. There are a lot of after-market parts on this car too–the same as the C&NW car above.

Here’s a practically one-of-a-kind model I bought from Tim O’Connor back in May, and I had time last month to build it up. Below, here’s a shot of my Sunshine Models Frisco 151000-series extended-height auto car. It’s a cool car but a little odd–a real “high-cube” of the 1940s. It looks like a square block. I’ll write more on this car in the coming months.

I have quite a few other models in progress, including:

Above. This is a B&O M-58 50-foot auto car. Fenton Wells and I had parts made for the car by Chad Boas this Spring. I had trouble getting the rest of the detail parts while I was still living in Germany, but here it is, 99% built up and almost ready for sandblasting. The car core is a Branchline 50-foot double-door car, with replacement roof, ends and doors from Chad, and aftermarket details all over. I did my best to approximate a Duryea underframe without having any reference photos of the actual prototype configuration. My model still needs a few more rivets.

And finally, below, here’s a model I’ve had for six years that’s finally seen the light of day. This is an O scale Intermountain R-40-10 steel refrigerator that I’m finishing as a PFE double-herald car. This is a beautiful kit. I’ve added a few aftermarket parts but only a few because the parts are so nice. I used a San Juan AB air brake set and that alone took two nights to install, but that’s what Proto48—O scale “fine scale”—is all about. The trucks are from Rich Yoder and are spectacular, but so is the price and that’s why I only have a few.

I’ve got a few more projects on the workbench but I’ll save those for the next post or two.

Moving is an outstanding way to renew oneself…to set new goals, explore new things, and learn, and let the change of pace and scenery work it’s magic. I’m happy to be back in a friendly place and I look forward to renewing friendships and enjoying some new modeling challenges. – John G

No. 173: The Rapido Pennsylvania Railroad X31 Model

It has been a very busy year at home and at work, and I’ve only been able to post three times on the blog. since January 1st. My last post was last week after a good railfan trip; the last modeling post was more than 60 days ago. Here’s a catch up.

Despite the lack of modeling and railfanning I was able to take the family on a few trips. Covid restrictions here are 99.9% history and everybody’s traveling again. I took the family to Eindhoven, Netherlands in late February for a long weekend–that was beautiful–and in March I took my youngest daughter to Andalusia, the region on the southern coast of Spain, for a week-long father-daughter getaway. We went there for hiking, sun and fun. There wasn’t much sun, but we went on a few epic hikes and had a great time together.

Below. During our trip to Spain, my daughter and I visited Gibraltar. Here’s a snap from near the top of the rock, with the channel between Gibraltar and Morocco in the distance.

We also hiked a trail in the mountains northeast of Malaga formerly known as “the most dangerous hike in the world”–the Caminito Del Rey. Part of the trail is seen below. The trail was rebuilt in 2015 and it is perfectly safe now, but it is still pretty scary.

Okay, enough of that boring stuff. On to modeling!

The New X31s

By now, most of you prototype modelers have seen Rapido’s new X31 cars. They’re outstanding models. I recall 15 years ago or so, the guys on the old Steam Era Freight Cars list on Yahoo Groups saying “We need a 21st-Century model of the X31!” Thanks to Bill Schneider and the guys at Rapido, we’ve finally got it.

My first two cars came in the mail in February. The Pros: I’m impressed with the overall appearance, paint color, lettering, running boards, fine details, ladders, wire grabs and sill steps. Brake gear is good, not great, but good. The Cons: The coupler boxes are ghastly (I understand they’ve gotta meet NMRA standards, but there’s gotta be a better to to replicate draft gear) and trucks (in the era of Tahoe Model Works, these are just plain bad). Bottom Line: They look great and are layout ready.

Below. The Prototype, circa April, 1937. Courtesy Bill Lane.

I upgraded my models starting with the auto car first. I replaced the couplers with Kadee #78s (and cut off those pesky trip pins) and replaced the trucks with Bowser PRR coil-elliptical trucks with Kadee semi-scale wheelsets. I painted the trucks with ScaleCoat 2 Oxide Red–that’s a really close match for the factory paint. That was it.

I started the weathering process by airbrushing the model with a few coats of clear Testors Dullcote. When that was dry I added a drops of Scalecoat Oxide Red to the Dullcote and mixed it up nicely–making a semi-opaque flat–then sprayed the car again to provide a flat overall finish using something close to the original color. Here’s a view of the opaque below.

Finally I airbrushed the underframe and lower side sills with a medium brown color to simulate some dirt build-up, and then added some car-knocker’s chalk marks with an artist’s pencil. Lately I’ve been using a white pencil for newer chalk marks and a medium gray pencil for older marks, and I like the effect. Finally I finished up with a little highlighting with various dark colors applied with a paintbrush. I sprayed on one more very light coat of the opaque mixture and called it complete. The placard is from Microscale.

Next I finished my single-door X31. Here’s the car right outta the box:

To prevent the cars from looking alike, I decided to heavily weather the single door car like the X31 in the photo below. Charlie Duckworth sent this image to the Proto Layouts list, which was originally taken by Joe Collias in St. Louis in the late 40s. I like the roof weathering and the contrast between the running boards. Check out the PRR T-1 on the right!

To begin, I replaced trucks and couplers as I did with PRR 69402 above, and then gave the model a few light coats of Dullcote.

Next I slowly applied AIM Weathering Powders–Rust and Dark Brown–to the roof. I applied the powders panel-by-panel and took my time. The Dullcote layer gave the powder something to stick to. I worked the powders in with the brush, toothbrushes and soft files. I found that a soft, thin flexible file works great to take off some of the powder and give a streaking effect. When I was happy with the appearance I applies Dullcoat to seal it, and then painted the individual running boards with tan, medium gray and oxide and then lightly sanded the colors in to blend them together. I wanted a stark contrast between the running boards and roof, and I think I got the effect alright.

On the sides, I slowly streaked the same AIM powder mix on the side sand ends. I used wet 0000-grade steel wool to work off some of the powder to get the look I wanted. I wanted the weathering to gather at the top and the bottom. I sanded a little harder on the lettering to weather the letters in to the background. Those details really pop with a little bit of weathering.

I applied and re-applied the chalk several times on the sides to get the look I wanted. Finally I added some chalk marks and sealed it for good with a last shot of Dullcote. I used a dark brown/dark mud mix on the underframe and added AIM Delta Dirt on the lower ends–a favorite weathering color. I think this model turned out pretty well and I’m eager to try it again.

Incidentally, here’s a Bowser car I built and painted in the late 1990s. It was photographed in 2001. The Bowser cars are still nice models and the price is right. I’ve got a repack stencil on the left side of the car, and black trucks. I must’ve finished five or six of these just like it.

Hopefully we haven’t seen the last of Rapido’s X31s. An X32 series would be nice–the 50-foot cars–and an X31F–the jeep carriers–would be nice too!

Three-Way Switch

Two weeks ago I drove up to Frankfurt, and on the way I stopped in Darmstadt, a small city right south of Frankfurt. There’s a lot to see there, including this–a three-way switch on a heavily-used industrial track that spins off the freight yard north of the city.

I’ve only ever seen two types of three way switches: 1) The symmetrical type, where tracks diverge on either side symmetrically on each side of the straight track, and 2) The asymmetrical, where a track diverges in one direction and another second track diverges 10-15 feet forward in the opposite direction.

This one in Darmstadt is different still. See below. In this arrangement, we have a straight leg with two tracks diverging in the same direction. It’s not quite a three way. I’d almost call it a compound turnout. Still, it has a Cool Factor of 10.0.

Here is a closer view of all three frogs.

Below. A view of the linkage on the second switch. It is brick-lined. I’ve never seen that anywhere else. This is motivation enough for a scratchbuilding challenge.

I haven’t seen too many of these in the U.S. In fact I can only remember seeing one–the famous three-way stub switch leading to the old engine house on the Aberdeen & Rockfish Railroad in Aberdeen, N.C. I did find one online recently, on the Flickr Milwaukee Road Project site–this one on the loop track in Beaver Dam, Wisconsin (see it at lower center where the road crosses?):

While on the subject of track, I did about three hours of railfanning this morning in nearby Mannheim. I stared at this turnout near Waldorf for 20 minutes. It looks like a double-slip, but on closer inspection I’m not so sure. It looks like another compound switch of some type. Whatever it’s called, it’s a work or art.

It was a good day of railfanning and I’ll write more about it sometime. The next post will cover a few National Car Company cars I just completed. Enjoy your weekend! -John G

No. 171: Freight Car Modeling: Rath Meat Reefers and Rock Island Single Sheathed Box Car

It has rained almost every day in southern Germany since about October 15th. Over 130 days of cold, wind, rain and darkness. It has made for good modeling weather, and a good ski trip in December and a good hiking trip in January, but not much else.

In the few month I finished two models–one an old classic, and another a “bespoke” single-sheathed car that I’ve been wanting to build for a long time.

The Mather Meat “Reefer”

Here’s a prototype view of the classic car, below, courtesy Bob’s Photo. This is a Mather company meat refrigerator car

The Mather company built stock cars, refrigerator cars and box cars and leased them to the railroads. The Mather fleet even included a few tank cars. Mather leased cars to some big railroads and many short lines. The Mather cars were unique in that they used “off-the-shelf” steel components rather that complex, proprietary parts used in many other cars. In so doing, they standardized car building long before most other carriers did.

Red Caboose made an excellent model of the Mather reefer, and in the early 2010s I built a few sof these models for my freight car fleet. When Rapido introduced their beautiful GARX meat reefers, I sold off both the Mather cars…and I regretted it right away.

I built the model above using the basic Red Caboose kit and used custom decals to decorate the model.  When I built this model, around 2011, I was still using Accurail trucks…

To overcome my sadness, I bought another Red Caboose meat reefer online last summer to replace the cars I sold.  I assembled the model per the instructions and used a few prototype photos as a guide.  I installed Cal Scale AB brakes (kit includes KC brakes) and Tahoe 40-ton trucks with semi-scale wheelsets.  I also installed Yarmouth metal sill steps to replace the kit-supplied parts. 

If it looks like the model in the photo above has had the factory paint removed, you’re right. This car came from eBay factory painted for the Rath Packing Co.  I managed to screw up the factory paint during the weathering process and eventually had to repaint the model.  I had applied a light coat of Testors Dullcote, and then applied a thin coat of black paint over the top to try and get the black paint between the wood sheathing on the car sides.  It worked well on most of the car, but the black paint streaked on one side by the door and turned all the sheathing black.  I couldn’t repair it.

Eventually I ended up sandblasting the whole model and repainting the carbody. After sandblasting I shot the car with a light coat of Mr. Surfacer 1500, and when that was dry I shot it a second time with Tru Color Milwaukee Road orange. Spraying with a light gray primer coat is absolutely essential when painting a white, yellow or orange carbody.

I talked to my friend Ted Richardson when I was painting and finishing the model.  Ted has done a lot of research on these cars.  Ted–an Illinois Central modeler–told me, “Based on what the retired guys from the Iowa Division told me the paint without the Indian Head logo would be good for the early fifties. The Indian Head logo didn’t come into use until 1953 based on our conversations. I have color photos showing roof and ends as the Oxide color. The guys said the underbody, and trucks were always rusty looking from the brine.”  Ted also mentioned Mather used their own reporting marks for short term leases (MRRX), and the leased cars were usually stenciled with the lessee’s name in black. 

I had a few Rath decal sets on hand, provided by a friend, so I was able to repaint and decal the car back to it’s original Rath-ness.  Meanwhile I painted the roof and ends Scalecoat Oxide Red and the underframe Testors Satin Black.  Then I assembled the major carbody components and applied the decals.  The decals were pretty thick, and it took several applications of Walthers Decal Set to get them to settle down properly.  See above.

When the decals were done I hit the whole model with a coat or two of Dullcote.  Next, I hand-painted the lower side sills and hinges per prototype photos.  I weathered the bottom of the car, trucks and lower side sill with a custom-mixed dark dirt color (made from tan and black paint) and then brush-painted around the whole model with a light tan to set off the decals.  I also applied a few chalk marks using a white Prismacolor pencil.  I weathered the roof with AIM Weathering Powders—a variety of rust, brown and black mixes—and sealed the roof and everything else with one more light shot of Dullcote.

Below. The decals are on and set, and the carbody components are painted and ready for final assembly.

When decaling a model with siding, I usually apply heavy coats of Walther decal setting solution to get them to settle down. Often the decals will not settle into the recesses between the sheathing, so I use a sharp, new x-acto blade and cut them across the sheathing, then re-apply the setting solution. I used that technique on this car and it worked well to help the decals settle.

After the model was built I brush-painted the lower side sills and hinges black per prototype photos.  I weathered the bottom of the car, trucks and lower side sill with a custom-mixed dark dirt-colored paint , mixed from tan and black paint, then brush-painted around the whole model with a lighter tan to set off the details.  I also applied a few chalk marks using a white Prismacolor pencil.  I weathered the roof with AIM Weathering Powders—a variety of rust, brown and black mixes—and sealed the roof and everything else with one more light shot of Dullcote.

The model turned out well, but I managed to break the bottom rung off of both ladders.  I trimmed them both off and will hope that nobody notices all that much. 

 Above, Here’s the new addition on the Hermitage Road layout. This was a straightforward build, but it took longer since I tried to rush the initial weathering which forced me to repaint and reweather the whole thing.

This year I’d like to slowly increase my meat reefer fleet.  Among the cars I’d like to model is this one, below–a somewhat rare 40-foot Mather reefer. I’ll have to kitbash it, and still haven’t found a suitable model to use as a starting point.  I think I can use the ends from a Red Caboose kit, and cobble some sides and a roof together from two kits. Photo below courtesy Chuck Yungkurth.

The Bespoke Rock Island Single-Sheathed Box Car

Living in Europe and watching a lot of British TV has made me familiar with a few common British terms. One of those terms I use frequently is the word bespoke, which means custom-made. In other words a custom-made model in American lingo would be a bespoke model, or just plain bespoke, in the King’s English.

I’m scheduled to write an in-depth article on this build for the Resin Car Works blog, so I’m not going to go into too many details here.

So what’s the big deal about this car? Westerfield makes a kit, but the Westerfield kit has as-delivered wood ends. This model represents a later car with Murphy ends. Oh, and it’s Not a Fowler car, by the way–which is also unlike the Westerfield model–even though Westerfield says it’s Fowler. I got a stern lecture from Steve Hile on this, and he should know being a Rock Island expert. Anyway, to make this Not-Fowler correct I used Murphy ends from a NYC kit. I’ll explain later in the RCW post.

While I was painting the 133000-series car I used the K4 set to also repaint this car below, which is an old Sunshine model. The 141000-series car looks a lot like the 133000-series car, but it’s taller. They have a nice family appearance–especially since I repainted them both with Tru Color TCP-197, Rock Island Freight Car Brown.

Meanwhile, the Hermitage Road layout continues to get a few upgrades. I lowered the top of the front fascia four inches to close in the scene a little more. I think it looks a lot better. It’s kinda hard to tell without a “before” picture, but I think this view sums it all up. I’ve just gotta finish that last darn building and the layout will be complete. Oh, and I still need to work on the backdrop a little bit more too…

Hope you’re all enjoying a wonderful spring. Slava Ukraini! – John G

No. 169: Best Train Wrecks of 2021

Reflecting on 2021

Post-Christmas is a great time for reflection and planning for the new year. I always like to make plans for the next year after Christmas. I think it’s a good way to set goals and “refresh” myself for the year ahead.

In my hobby life, it’s a good time to reflect on my wins and losses for the year, and make renewed plans for the new year. I think I had some good hobby wins—I finished a lot of projects and the Hermitage Road layout is now about 90% complete. But I had a whole lot of less-publicized losses which also need to be recorded—in other words, my best train wrecks for the year.

Best Train Wrecks of 2021

Like the photo above, train wrecks are best shared with other people.

This Milwaukee Road car was finished in March. I’ve been trying to slowly add some 50-foot cars to the fleet to add some variety. I took a lot of time to get the build right, and get the paint color right, and get all the details right. After laying the decals down, I hit it with Dullcote. Then I noticed that there were some prominent bubbles in the Route of the Hiawathas decal. See them all trying to hide on top of that rib? If I try to fix it I’ll ruin the rest of the finish. So I’ll just have to face that car away from the aisle forever.

Doesn’t that make you wonder why we finish both sides of a model in the first place?

This is a Monon single-sheathed Fowler box car that I bought from Chad Boas at St. Louis RPM 2017. I decided that I wanted to build new ends, so I cut the model up and added new ends and a replacement Westerfield roof. Well, one thing led to another and I tore up everything to the point where I had to consign this one to the round file. I’ll try again…this time with an Accurail car.

Here’s an NP Historical Society War Emergency box car, finished a year or two ago. The decals cost twenty bucks (!!!) and were beyond thick. Thick decals for a single-sheathed car are a bad combination. They went on terribly and I worked on them for weeks. I‘m mentioning this one because this year I discovered Walthers Solvaset, which is much more powerful than MicroScale Decal Set, and I think had I used Walthers Solvaset on this car I would’ve had much better results.

Turning Cars White

I got really good at turning finished models white this year. Really good. It happens when applying Testors Dullcote to a finished model to seal the decals and paint. There are a lot of theories why this happens; in my experience, it occurs when the atmospheric humidity is greater than 40-50%, and also sometimes when the mixture is wrong (Dullcote + thinner) and sometimes when the atmospheric temperature is doing something stupid (too cold, or too hot, with perhaps some extra moisture in the air). It also happens if the coat goes on too thick, or if there is latent humidity on the model. Sometimes I think it is caused when the Dullcote dries in the air, after it leaves the airbrush on the way to the model.

Check out this New York Central hopper. It was formerly an M&StL car that I sandblasted, rebuilt and repainted with new K4 decals. The Dullcote pooled in the corners and turned a nice snowy white.

I was able to remove most of the coating by painting the model with paint thinner once or twice and thinning the dry Dullcote. Then I weathered the car a little heavily to fix the problem areas. I didn’t intend to heavily weather the car, but to avoid yet another trip to the sandblaster I weathered it hard and put it away wet. Results are okay (seen below).

I rebuilt this Wabash car in August while the family was away in the US for a few weeks. I painted it with Tru Color Wabash Freight Car Red and used the new K4 Wabash decal set to finish it. The model is an old Sunshine mini-kit. Well, wouldn’t ya know—after I hit it with Dullcote and it turned white. The picture doesn’t show it too well, but when it dried it looked like it was frozen.

In my anger I didn’t take a picture of its snowy whiteness. Instead, I brought it to the workbench and painted it with paint thinner to reduce the Dullote, and that worked somewhat. Once again, I had to heavily weather it, but I found that was a little prototypical since these cars were rebuilt in 1940 and by 1950 they were trashed.

Here’s the over-weathered version. I think another repaint is in this car’s future…

Here’s a hard-to-find Sunshine Rock Island rebuilt flat car that I bought on eBay a few years ago. I built, painted and decaled it, then turned it almost completely white with a bad shot of Dullcote. I sandblasted it, and found a set of decals from Hubert Mask that would work. So I re-painted and re-decaled the model…then turned it completely white again. A few paint-thinner baths and some touch up later, here’s the result. What a mess.

This CB&Q 50-footer, which I carefully built and added all kinds of things to, including a lot of expensive Archer rivets. To improve my chances I tried using Mr. Hobby flat finish. Test shots went on great. Yet somehow I managed to turn this model almost completely white as well. It’s now completely stripped and ready for a second try.

Below. All those expensive rivets…and decals…have been blasted away after I turned the whole bloody thing white.

And this Sunshine Models Milwaukee single-sheathed box car? The first paint job I put the wrong number series on the car. I robbed the decals from another Sunshine kit and repainted it, but it turned out so bad that I couldn’t live with it. The third time—using K4 decals—was a charm. There’s a more details discussion on the repainting at https://railroadprototypemodeler.wordpress.com/2021/11/20/no-172-completing-the-traverse-table-and-milwaukee-road-single-sheathed-box-car-re-do/.

Third times a charm:

Without a doubt the biggest train wreck of the year was this MP car. I spent about eight hours rebuilding this thing. Everything went well, including the paint, decals and Dullcote. When it was done, I looked closely…and found out that I put two different numbers on the car. One side is 86147 (correct) and the other side is 89147 (incorrect). Holy crap.

Best Layout Wrecks of 2021

I managed to pack a lot of wrecks into my 7’ x 18” layout this year. For example:

I built the coal yard, then took it apart and re-laid the track, then rebuilt the coal yard again…twice.

I rebuilt the grocery warehouse three times, as I outlined in my last blog post.

I built—to a level of 99% completion—the Alcatraz Paint & Varnish Co. Then I removed it and replaced it with the Sitterding, Carneal & Davis Mfg Co. (both were prototypes served by the SAL). I built two versions of Sitterding, and am modifying version two already.

Here’s Alcatraz, below. It’s gone.

The team track loading ramp didn’t escape either. I laid it down, moved it and destroyed it, then rebuilt it, and moved it again. Twice.

Here’s the team track ramp below. In the background are several other versions of other factories that I tried for a few weeks. They’re gone too.

Lessons Learned

1 – Do it right the first time!
2 – My actual hands-on hobby time is limited to about five or six hours a week. Rounding up, that’s about 300 hours a year. Note: Last year I spent probably 150 hours fixing mistakes.
3 – See #1.

There’s a footnote too: NEVER, EVER freelance a layout.

2022 Plans

I’m facing a move from Germany to the US in 2022. I’m also facing a career change. That’ll shake up my life and the first thing to go will be all my hobby time.

That means my hobby time will be even more precious. So I’ve really got to slow down and do things right the first time so I can finish 2022 with more wins, zero losses, and zero ties.

Hope you guys had a better year than I did! – John G

No. 168: Hermitage Road Layout – Modeling the Grocery Warehouse

On my little Hermitage Road switching layout, I wanted to include a grocery warehouse to generate refrigerator car traffic on the small layout.

There were a few grocery warehouses in the Hermitage Yard area that were rail-served through the 1950s so I felt it would be okay to include one on the layout. While studying Sanborn maps, I didn’t find any in the immediate area on the Seaboard, but I found several in the Richmond area on the ACL and C&O lines.

This photo, below, provided some inspiration for my model. I understand this one was in Dallas, Texas.

When I planned the layout last year I felt a grocery warehouse could work on either end of the layout. I wanted the track in front at the edge of the layout, with a larger building immediately behind it, to 1) Get the cars as close as possible to the operator, and 2) allow the track to run into the fascia to create a feeling that the track continues well beyond the fascia.

Below, here is the layout under construction last year with a box serving as a stand in for the grocery warehouse. You can see how I’ve got the track running in the foreground but behind the fascia.

Before I built the layout, I built up one of those Walthers Reliable Warehouse models for fun. The build was straightforward. I painted the model with Tamiya Flat Brown, XF-10 and used Tru Color Concrete on the foundation and Testors Guards Red on the windows. During construction I used Robert’s Brick Mortar on the model and it went on very well and the results were excellent.

Here’s a view, below, of how I wanted the building and track to be in the foreground with the track running behind behind the fascia.

I completed the model before I built the layout, and arranged the track around it, but it never quite worked out right. After a short while I replaced it with a larger structure made from Walthers Cornerstone Modulars, seen below. The Modulars building was way too big, and I felt it overpowered that side of the layout. So I removed that one and set it aside too.

Then I built a third version using parts left over from the Marshall Canning Company structure on my old Ackley, Iowa layout. I added a photo of that one below. I built several increasingly smaller versions. I was not able to get the mortar between the bricks to my satisfaction so I scuttled that project.

Frustrated, I went back to the original reliable warehouse building. I tore it apart, rebuilt it to fit the space, and here’s the result. Putty has been applied to a few gaps leftover after I deconstructed it and put it back together.

I scratchbuilt the elevator machinery house and the staircase on top using leftover material, and the chimneys are metal castings from various kits collected over the decades. I also built gutters from styrene strip and made lamp-posts from Tichy lampshades. I’m VERY happy with the final version.


Above and Below. Details for the grocery warehouse.

Here’s the final version, installed on the layout and 99% complete. About the only thing left to do is to weather the tarpaper roof somehow (it is black construction paper). That can wait a while though.

And there you have it–many versions of the same building, but finally we have one we can keep!

Rock Island 133000-series Box Car

Here’s a freight car project I’ve been working on for a few months. This is a Rock Island 133000-series single-sheathed box car that I built from parts from various Westerfield kits. I contacted Andrew Dahm at Westerfield and asked him about the car, and between us we figured out which parts might work to kitbash the car from Westerfield parts. He sent me a box full of kits and I got to work.

In the meantime, I contacted Mike at K4 decals and asked him if he could make up a decal set for this car and a few other Rock Island single sheathed cars. I also got in touch with Steve Hile, an RPM friend of mine and a Rock Island expert, and together we put together a data package for Mike. Steve did 99% of the research work. Mike had the decals ready in less than a week. In fact, I already have two sets here in Germany.

Here’s the link to the decals: Rock Island 40 Ft Single Sheathed Boxcar White – Decal – Choose Scale – K4 Decals – Model Train Decals.

My model is built, sandblasted and ready for paint. I’ll send a complete post on the model in a while after it’s finished.

I hope you all had a wonderful Christmas celebration and I wish you blessings for 2022! – John G

No. 167: Completing the Traverse Table, and Milwaukee Road Single-Sheathed Box Car Re-Do

I had minor arthroscopic knee surgery last Wednesday and took a few days off from work to recover. I was able to make some good progress on the layout during those days. Here’s an update.

Traverse Table

Here’s what the small, 7 x 18-inch Hermitage Road layout looks like today. At the far end, the dark square box is the entrance to the staging area.

Below. Here’s the other side of the portal to staging. There wasn’t enough room for a traditional staging yard with all the turnout ladders and all that, so I built a British-style traverse table instead.

A traverse table is a yard without the turnouts. The advantage is that it saves a lot of space in a given area. My design has a single entry track from the layout, a five-track “table”, and two exit or runaround tracks at the opposite end. The table is secured to the layout with a single screw underneath the center of the table. Each yard track holds 5-6 cars plus an engine. I used Atlas Code 83 track because I had it on hand.

In this photo, the traverse table tracks are mocked-up to see what’ll fit. The drawer slides are underneath the table, and extend out behind the table to allow the table to slide across all five tracks in either direction.

Below. After the table was built and aligned, I was able to lay track. First, the roadbed must be placed. Getting everything straight and lined up as perfect as possible is important since the all the tracks need to line up on each end of the table. After gluing the roadbed down I used switch locks to hold it in place.

Below. I laid the roadbed at the entrance end first. Then one-half of the roadbed was laid using a straight-edge. Before going any further, I waited a day and allowed the glue to dry, and then glued down the other half of the roadbed.

Below. In this photo, roadbed for three tracks has been laid. Using the 90-degree angle tool and the long straight-edge kept everything in proper alignment.

Below. All the tracks have to be spaced exactly the same so they will line up with the end extensions.

After all the track was laid, I wired up the table. Wiring was simple. I had to wire the front and end extensions, and each track, and that was it. I wired all the tracks together into a bundle and left enough slack in the bundle to allow the table to move. The track wires have quick connections so I can disconnect the table in just a minute if needed.

Below. Work in progress. What a mess!

Below. One of my daughters came upstairs to give me a hard time.

The layout is now operational again, thanks to the Mr. Traverse Table. Below, you can see that the engine is powered up and we’re hard at work moving coal cars through the portal to Hermitage Coal Co.

If you look closely at the bottom of the photo you can see that the height of the table doesn’t quite match up with the end. See the difference in track height? That’s something that needs adjusting soon.

Milwaukee Road 713471…or is it 714142?

You may remember this car from a previous post. It is an old Sunshine Models car that I finished about a year ago. I used the salt weathering technique on the roof, but in this case was never quite satisfied with the look.


Above. In August, during my “16 Days” building bonanza, I stripped the paint on this model and started over. First I sandblasted the model and then repainted it with Tru Color TCP-213 Milwaukee Road 1930-50’s Freight Car Brown. I decaled the car with K4 decals’ Milwaukee Road Single Sheathed Boxcar set.

The weather here in Germany was nice in September so I set up a table in the garage and did a lot of painting out there. Unfortunately, when I shot Testors Dullcote on the roof of this car, the finish turned white.

Below. Time for damage control. I gave the roof a bath with paint thinner and that took off most of the white residue. Then I weathered the roof with various AIM weathering powders, like Soot Black, Weathered Brown, and Oxide. I mised a new batch of Dullcote and sealed the powder.
A couple of weeks ago, Charlie Duckworth posted on one of the Groups.io lists and showed a few new cars he’d built. One or two of them had really nicely-weathered running boards. He used darker gray colors–darker than I normally use–and they looked great. I mixed up a palette of grays, and mixed in some earth tone paint color, and used used various shades on this car. I think it turned out well. Contrast is the key!

Finally, a last overhead view. I think the weathered running board turned out well against the darker roof.


What’s In The Box?

I got a mystery box in the mail last week with my long-awaited Rapido PRR X31-class box cars!

The cars look terrific and they are a great improvement over the Bower models, which–despite the molded-on stuff–I always thought looked great too. I got one of each for now because I need to save my sheckles for X-3s, GLas, an SP single-sheathed car, and whatever else they can surprise us with.

The Pros, in my opinion: Overall appearance, color, lettering, brake gear, details like grabs, etc. The Cons: Trucks (they’re awful!), brake wheel, coupler box/draft gear (why can’t we have something with some detail???), #5 couplers. There’s also no bell crank on the B end, but I’ll have to research that to see what equipment the real cars had. As for replacement trucks, Bowser has a nice pair of PRR-specific coil-elliptical trucks that can be used to improve the models.

Below. Here’s a closeup of the B end on the auto car. It looks terrific. The PRRT&HS had a lot of say in the development of this model, in particular the paint color, and I trust their judgement.

May God richly bless you and your families during Thanksgiving. Don’t forget to give thanks! – John

No. 166: Modeling Rock Island Steel Box Cars

In August, during the “16 Days” work campaign, I began a project to rebuild and repaint a dozen or more freight car models.

Two of those models were Rock Island favorites. The first was an Intermountain 1937 Modified AAR car that needed to be stripped and repainted because I did a poor job of decaling and finishing the first time around. The second was a Sunshine Models USRA rebuild that I finished 15 years ago or so, which needed updating. I just finished those models last week Here’s the report, with a little history.

RI 146309

Rock Island rostered over 4,100 1937 AAR Modified box cars. They were delivered with a variety of different doors and features, and some were outfitted with Duryea underframes. Some cars were built as express cars and were delivered with Allied full-cushion trucks. Refer to Ed Hawkins’ car rosters for detail on each series.

Below. I’ve built a number of models of these cars over the years. Here’s one of the first I built, photographed in 2001 in my back yard when I lived in California. There were fewer aftermarket parts back then, but still I installed the wrong type of grabs, and for some reasons painted those old fat-wheel Kadee trucks black. Those are Champion decals too.

Below. I took this photo in 2004 after living in Illinois a year. RI 146756 was yet another car for the roster, but my technology had not improved. In the background is yet another Rock Island car.

Below. I finished this car, RI 146301, in 2007. Better trucks and somewhat improved brake gear (as far as I can tell from here…), but I was still using Champ decals, and still no leap in finishing.

Below. RI 147313 shows some improvement. I finished this model around 2013. This model has Tahoe trucks and semi-scale wheelsets, better decals (a combination of Hubert Mask and Champ), and much-improved brake gear modeling. This was also the first model that I applied Kadee grabs to.

I covered the Salt Weathering technique in a previous post, which can be found at https://railroadprototypemodeler.wordpress.com/wp-admin/post.php?post=9909&action=edit.

Turn the page six years. Let’s try again, this time with a now-hard-to-find undecorated Intermountain kit. I get rid of many of the parts–the trucks, running boards, grabs and the details and replace them all with better products. It’s about time for a 21st Century model of this car, isn’t it?

The latest model was assembled with Cal Scale brake gear and a ton of aftermarket parts all around. I installed the grabs using the Yarmouth Models template, taped to the car and then drilled through. I fixed the grabs with canopy glue. Getting the grabs on the ends lined up is NOT easy, but worth the time spent. I’ve run out of Jim King’s draft gear boxes and used Kadee #178 coupler boxes—not a bad compromise. So far, the build is pretty good and a trip through the sandblaster will clean up most of the mess and prep the slippery Kadee plastic for paint.

As I mentioned above, I finished the model about six months ago, but the paint and finish was poor so I immediately stripped it and repainted it. Here’s why: I used K4 decals for this model; when they arrived in the mail they were wet. I attempted to use them on this car and they did not go on well. I continued to finish the car and the results were not what I hoped for, so back in the sandblaster it went. Here’s the new model ready for paint…again…

And here we are after painting. I’m using Tru Color RI Freight Car Red, TCP-197 Rock Island 1930-60’s Freight Car Brown, thinned about 30% with Lacquer Thinner. Again, a technological leap over Scalecoat, in my opinion, with the added advantage that Tru Color is dry and ready for decals in 60 minutes.

I made my own running boards for this car using plastic strip. I should’ve taken more care to leave some space between the boards on the latitudinal.

Mike at K4 Decals was kind enough to send me replacement decals without charge. He sent the decals in plastic sleeves, but the sleeves weren’t sealed shut and somewhere in the trip to Europe they collected a little moisture. The replacement decals came in a box with sealed plastic and were perfect.

I’ve found that K4 decals are somewhat thicker than Speedwitch or Microscale decals. Microscale Decal Set and Testors Decal set had little effect on them. I tried a stronger setting solution—Walters Decal Set—and that worked great to get the decals to settle around rivets and detail. It’s pretty strong stuff and usually worked well in just one application.

Ultimately I plan to model two of these cars. This one, from the 146000-series without a Duryea underframe, and a second car from the 148550-149049 series with a Duryea underframe. George Toman displayed some inspirational work on the Resin Car Works blog modeling one of the cars with the National Scale Car Duryea underframe set, and I want to copy his effort soon on the second car. George’s article can be found at http://blog.resincarworks.com/workbench-wednesday-26/#more-2733.

Here’s my car, about 99% finished:

Back on the rails she goes!

RI 134541

RI 134541 is the other car I recently rebuilt. This is an old Sunshine Models car I’ve had around for about 15 years. It’s a cool model of a cool prototype, and even though Sunshine Models is gone you can get a kit from Chad Boas and make your own.

Rock Island rebuilt 800 USRA double-sheathed box cars to this configuration beginning in 1936. C&NW rebuilt over 1,200 of thier USRA double-sheathed cars similarly. A spotting feature of both car types is the original USRA 5-5-5 end with a blank panel added in the middle to increase the height of the end. There’s excellent coverage of these cars in RP Cyc #24.

Here’s a Jim Sands photo of a Rock Island car, circa 1960, courtesy Clark Propst.

Here’s my starting point for the rebuild, below. The photo is circa 2008. Why rebuild it? The model is the wrong color, and I got some silvering behind the decals that I could never fix.

First things first. A trip through the sandblaster cleaned off the weathering, all of the Dullcote, and prepped the surface for new paint. A little more pressure took the decals off.

Details used on the model include A-Line stirrups, Tichy 18-inch drop grabs, Hi-Tech air hoses with brass brackets, Tahoe Model Works 40-ton trucks with semi-scale wheelsets, and a Cal Scale brake gear set.

I thought the original build was pretty good, so I went ahead and painted the car without any detail upgrades. Here’s the model repainted with Tru Color TCP-197 again, which as you can see is a lovely, light maroon color.

Decaling was straightforward. I used the same K4 Rock Island box car set for this model, but I had to cut out the numbers to get the right number combination. I also had a leftover Rock Island decal set that came with the original kit I built all those years ago, and used the 80,000 lb. CAPY decals to get it right. Once again I used Walthers Decal Set because it works great with K4 decals.

I referred the prototype photo above for placement of the monogram. Note the monogram is NOT centered within the right side panels.

After decaling the model I hit it with a few light coats of Dullcoat and a few light coats of Testors Light Earth for weathering. I really didn’t want to over-do the weathering on this car.

Below. A closer-up view of the B end. The blank panel in the end is well-represented.

Here’s the finished model, below, on the layout and ready for action. I made the photo black-and-white to add a little period effect.

Hope you all have a great week! – John G

No. 163: 16 Days, Pt. 4

The 16 Days program ended last Monday when my wife and daughters returned from their U.S. trip.

In those 16 days I was able to complete major work on several structures for the layout, rebuild and repaint a dozen freight cars, complete construction on one new freight car, and paint the traverse table for the layout. I also sold five models on eBay and in other places, and I also spent a considerable amount of time writing on this blog.

I normally try to keep the layout and workbench very clean and organized, but during the 16 Days I allowed myself to leave everything a hot mess so I could go right upstairs and pick up where I left off.

I originally estimated that I could accomplish 73 hours of work during the 16 Days. I was only able to complete about 36 hours of hobby work, however. I underestimated the time needed for my day job, chores, yard work, daily exercise, a few parties/get-togethers, and other things that took away my time.

The significant layout project was finishing the traverse table. I was able to disassemble, paint, and reassemble the traverser but that was it. It was a hot day, and my house doesn’t have air conditioning, and the third floor train room got really hot. I didn’t get too much done that weekend. There’s a lot of work to be done still.

On the layout, among the projects I wanted to complete while the family was away was painting the fencing for the Hermitage Coal Co. and building, painting and applying mortar to the grocery warehouse.

The fencing is made by Tichy and comes in six-inch sections. The fencing took a few hours to assemble and paint, then it was painted with Tamiya Medium Brown. Then I painted a few of the individual boards with various shades of tan, gray and dark brown. Next I applied a thinner-and-black-paint wash to get black paint into the crevices and the board detail. Finally, I gave it a light coat of Medium Brown again to blend everything together, then sprayed it one more time with Testors dullcote to finish the job.

Before installing the fence I need to do a little scenery repair, and also shorten the coal company track about four inches.

The grocery warehouse is coming along. Below, I have applied some Roberts Brick Mortar and am letting it dry. At this point, I’m not too happy with this model. It’s gonna need a lot of work…

Below. The grocery warehouse after mortar removal. I still don’t like it, but I’ll keep working on it and give it a chance.

Fortunately I was able to get some big freight car work done during the 16 Days. I was able to check a dozen models for operation (checking coupler height, cleaning wheels, minor repairs, etc.)–something that I don’t do very often.

Here’s one car, below, that got some much-needed attention. This is of course a Proto 2000 model, and my records indicate I’ve had it since 2003. I’ve upgraded the tracks and a few details since then, and I’m still very happy with the paint and weathering. It’s a keeper.

Below. I have been unhappy with this car for a long time. This is a Tichy rebuilt box car with a Sunshine mini-kit applied. I finished this car in 2008; the photo below dates from 2013. I have never been happy with the color, and the Wabash lettering on the right side of the car “silvered” for some reason–on both sides too.

Last week I sandblasted the decals and weathering off and then fixed a few original construction problems, like the placement of the grabs on the corners, and I also replaced the door tracks.

Below, after sandblasting I added a replacement door track and also the missing sill brackets.

I also removed and replaced the grabs on each corner to line them up prototypically. I’ve repainted the car with Tru Color #191 Wabash Freight Car Red and have new K4 Decals ready to go. That coupler pocket is ghastly!

Another car I was unhappy with was my Sunshine Models Illinois Terminal single-sheathed box car. This is a cool car, and at 37 feet long it stands out in a crowd. But, I just wasn’t happy with the color and weathering. Here’s a photo of that car I took on my old Ackley layout:

I sandblasted the lettering and paint off the car, replaced a few details, and repainted it last week. Here’s how it looks today. I’ll be using Resin Car Works decals to re-letter the car.

Here are a few more cars that I rebuilt and repainted.

I sold my Tichy B&O USRA SS Box Car online last week and am preparing a replacement, below.

Why get rid of a good car and replace it with another? I spent the time to put the side grabs in the right place and install additional rivet detail using Archer rivets. The grabs line up properly, and are in the right place (the car kit suggests they should be further toward the center of the car; proto photos indicate otherwise) and I also added Archer rivets below the NBW castings. Unfortunately the Archer rivets have disappeared.

For some reason, I didn’t use the awesome Tichy running board. I replaced it with styrene strip. I think the styrene strip running board looke=s great, as seen below, but it is missing the great Tichy bolt detail.

I’ll be using Speedwitch/National Scale Car decals for the car above. The car below is a Sunshine Rock Island rebuilt USRA double-sheathed car that also was rebuilt and repainted. Apparently I forgot to paint the trucks at the same time…

A shout out to my buddy Jim Dufour, who finished a similar car recently and sent a photo to a chat group I participate in. C&NW had prototype conversions similar to the Rock Island cars, and Chad Boas makes kits for both of them. Jim used the Chad Boas kit for his model, below, and did a superb job with it. The weathering is perfect. Love that Viking roof too!

Yet another Rock Island car is below. This is a 50-foot rebuilt flat car, another Sunshine Models kit, with Tahoe Model Works Dalman trucks. It’s hard to see but this is the car with the big splice panels on the side. Unfortunately the kit didn’t come with decals, but Clark Propst showed me a Hubert Mask set that should work.

Below. Here’s the new build I finished during the 16 Days. This is a CB&Q 50-foot Box Car from the Proto 2000 kit. Next: Sandblasting (again), then a coat of paint, then a lot of extra rivets, then a final shot of paint before decals. I’ll be using the awesome Speedwitch/National Scale Car decal set for this car too.

The CB&Q XM-28 is alas another Sunshine kit that got new paint and decals a few months ago. Last week I weathered it, applied some chalk marks with a white Prismacolor pencil, cleaned up the wheel treads, and got it ready for service. The car look alright and is ready for the layout.

So that’s it–the 16 Days came and went. I got a lot done but still have a long way to go. Priorities for the rest of the calendar year are finishing the layout, and finishing all these cars, and getting another engine or two detailed up.

See ya next time! – John G

No. 162: 16 Days, Pt. 3

Work on the railroad continues as the family is traveling in the U.S. for two weeks.

One of the industries I built this week for my Hermitage Road switching layout as a “grocery warehouse”. In the area of Richmond, Virginia, where my layout is set, there were quite a few grocery warehouses, and I wanted to include one on the layout so I could use refrigerator cars. There are no known photographs of the grocery warehouses in the Hermitage Yard area so I was forced to proto-freelance something.

On my old Ackley, Iowa layout I built a large cannery as seen in the photo below. This week I took the building out of storage and took it apart, cleaned and repainted everything, and then reconfigured the walls into a much smaller building that fits in the corner of the new layout.

Below. A view of the Marshall Canning on my Ackley Layout. The building was 36-inches long.

Below. The new grocery warehouse on the Hermitage Road layout. On the right side of the layout, the track runs behind the building; I intend to build a loading dock that extends past the end of the building on the left. The windows are ready to go–all I need is time to paint and weather the building.

Here are the old doors and windows from Marshall Canning. The windows and personnel doors are from Tichy, and the loading dock doors are scratchbuilt using scribed styrene and strip styrene. I think the building will look nice with a medium-brown brick with red trim. The large Sitterding mill behind the grocery warehouse will have green trim to keep all the buildings from looking alike.

Below. Believe it or not, I have already built two grocery warehouse models for the Hermitage Road layout. Here’s the first one I built, using a Walthers Cornerstone building I had on hand. On this side of the layout, the track runs in front of the building to simulate that it continues to other industries. This structure was built to fit behind the track. With the track in front, I get to enjoy seeing my freight cars a little more.

I used Robert’s Brick Mortar on the building and I think it came out really nice. Alas, I thought this building was too tall, and took over the scene, so it has been removed and is stored away. The Southern Fuel and Oil Co. will go in this spot instead.

This spring I built a second grocery warehouse using Walthers Modulars. This version was only two stories tall so it was less imposing, but after I completed it, I felt it was too big and too deep. It just didn’t scratch the itch. I wanted to use Walthers Modulars for the Sitterding building, so I dismantled this one and have reassembled in into the current Sitterding building which was shown in the last post.

The Southern Fuel and Oil Co. will go in this spot instead.

Meanwhile, work continues on freight cars. These are two favorites, below, but I haven’t used them on the layout yet because I was unhappy with my roof weathering efforts. The model on the left is an Intermountain 1937 Modified car, and the model on the right is an Intermountain “War Emergency” box car. Both these models were built and painted about 6-7 years ago.

Below. Here are the roofs. When I built these models, my research indicated that Viking roofs on CMO and C&NW cars were galvanized with paint on the seams caps. I painted the roofs on both cars like the one on top; with silver, and black or red seam caps.

Why didn’t I like these roofs? In the first place, galvanized metal doesn’t really look silver. It’s more gray, so I wasn’t happy with the finish. In the second place, I recently talked to Ed Hawkins and he said that ACF documents indicate that roofs on both of these cars were painted the same color as the carbody. Below, I’ve sandblasted one of the roofs and will blast the other this weekend, and repaint them soon. The roof on top, incidentally, has a Kadee running board and the roof on bottom has a Plano metal running board.

Y’know…after sandblasting…the one of the bottom looks pretty good just like it is, doesn’t it?

While I was sandblasting, I put an old Kadee hopper in the booth and blasted the paint off it as well. Earlier this week I ordered a Missouri Pacific detail set from Resin Car Works, and I’ll use that to rebuild and repaint this car. I will model one of the MoPac cars with the horizontal seam on the sides.

From the Resin Car Works site, below. The model I’m interested in is on the right:

The link for the MoPac decal and detail set can be found at http://resincarworks.com/decals_parts.htm.

Also in progress is this new build, a CB&Q 50-foot steel box car using the Proto 2000 model. I got a couple of kits from my friend Greg Silva. I’m using a printout from a Ted Culotta presentation to help me get the details right.

Car construction consumed a couple of evenings this week. One of the hardest jobs was installing Kadee bracket grab irons on the car sides. I used the template from Yarmouth Model Works. Getting the template in the right place isn’t easy. Once the template is in place, I drill the holes and then remove the template. Then I have to enlarge the holes to fit the mounting tabs on the back of the grabs. I use canopy glue to affix the parts, and when it’s dry I go over the whole area with Tamiya liquid cement to melt everything together. Then I sandblast it so the Kadee parts will accept paint. It’s a lot of work but the parts look great.

Here’s the workbench during construction of the new Q car. I cut out all the parts, and build the subassemblies, and then assemble the car when all the subcomponents are ready. There’s a whole lot of after-market parts on this table–from Yarmouth, Hi-Tech, Detail Associates, Cal Scale…the list goes on. No wonder I don’t have any money!

You can see another car there on the right. That’s an Intermountain 1937 Modified car kit that I’m finishing right behind the Q car. That’s Missouri Pacific 1937 Modified car and I’m using the awesome National Car Company mini-kit for that build. I’ll talk about it next time…

The last thing I did this week was swap components from two Kato engines to convert my Milwaukee Road DC RSC-2 to sound/DCC.

I took apart my NYC RS-2, equipped with a SoundTraxx sound/DCC setup, swapped the trucks, and married the sound/DCC underframe with the RSC-2. I felt kinda like Dr. Frankenstein doing this–taking an engine without a brain and swapping it for one with a brain.

Here are the victims in the lab. Body parts all over the place!

After an hours’ worth of work, I had a sound/DCC-equipped RSC-2. I still have some work to do on the cab–it needs a crew and open windows, and I also need to replace a few grabs and lift rings.

The next night I put the NYC RS-2 back together and sold it on eBay for cheap. No need to keep too much stuff around the house.

Work continues this weekend, as I paint freight cars, finish the traverse table, and continue structure work. Only 36 hours are left…gotta work hard tonight! – John G