

We went to the Netherlands last weekend for our kids’ last swim meet of the year, and on the way we took a short side-trip through Belgium to make a beer run. We stopped at a Delhaize grocery store in Houthalen on the way to Eindhoven and stocked up. Here’s my son Jacob, below, with a cart-full of the good stuff plus a whole lot of stroop waffles.
If you’ve never had Belgian beer and stroop waffles, you need to come and visit. They’re life-changers.

Unbeknownst to me, Houthalen is in a mining area. On the way to the grocery store we drove by this thing on display near the center of town. My son and I walked over and had a look around and took a few photos. It is obviously an underground engine that runs on gas or compressed air (minimum emissions for underground service, right?), but I wasn’t able to find anything about it on the interwebs.

Here are a couple more photos. I estimated the gauge at 2-1/2 feet. I don’t see any provision for a headlamp.

I got in one of the photos to provide a size reference. I’m 5′ 8″. The engine is small, but the cool factor is huge.
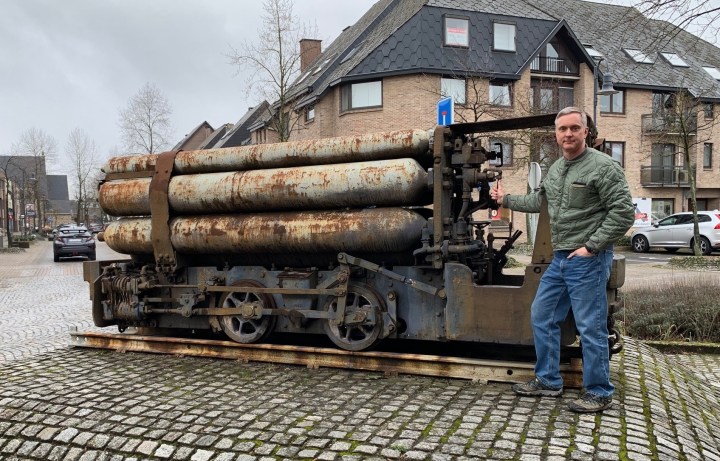
I’ve never seen an engine like this and I need to do more research. If you know anything about it please send me a note.
Moving Day
I’ve been bragging on the Proto Layouts list on Yahoo for a couple years that I built my layout to be modular, and that “I can take it apart and move it in an hour or two!”
Well, this weekend I did it–I disassembled the whole thing and moved it to the other side of the room. And yeah, it took me a whole lot longer than an hour or two. I’ll get to the “why” in a minute.
Here’s what the layout looked like before I took it apart and moved it. Nice and clean, about 95% complete, and about 90% operational (except for signals).

The layout occupies half of a large, 20 x 40 foot upstairs den in our home in Germany. The layout is set up on one side of the room. The other side of the room is set up as a family den and computer/homework/study area.
If you look closely at the photo above you’ll see the chimney (there’s a photo hung on it) and that has always been a problem because there was only about 12 inches of clearance between the chimney and the layout. The photo below is from December, 2016, and shows my son (in the red shirt) and his cousin running trains. You can see how tight it was behind the chimney.

To get around the problem, a few weeks ago I asked my wife if I could move the layout to the other side of the room. She said yes, which–translated from Wife-Speak–means “Yes, but you have to do all the work.”
The Plan: Move the layout to the other side of the room–where the chimney won’t be in the way–and move the den and computer desk to the side of the room currently occupied by the layout. The room is symmetrical so the layout should fit on the other side, making the move pretty easy.
Here’s the den side, which is in a perpetual state of disarray on account of living with three teenagers. My wife is treasurer of the kid’s swim team and has a temporary table set up this week, adding to the mess.

Step One: Disassemble the layout, starting with the south-side staging yard. Here’s the yard along the wall. Starting Time: 1300 hrs.

Below. By 1340 the yard is removed, plus the hidden corner curve at the end of the layout. Now to clean up and get ready for Step 2.

Step 2. Remove the two main layout sections. This shot below shows where I had to break the scenery to separate the two 2 x 8-foot sections of the layout. I laid scenery over the joint years ago knowing it would be destructive to separate later. It took a couple of hammer blows from underneath the break the scenery, and then I was easily able to move both sections to the other side of the room easily.
A new problem has been created. I can’t easily join the sections again, so I will have to simply the scenery here. In the grand scheme of things, this isn’t a big deal. Revising this will make things easier during the next disassembly.

Below. Here is the layout room with the half the layout removed and the floor cleaned up. Next I played life-size “Tetris”, moving the den furniture and the layout around the room a few times to get everything in it’s proper places.

Here’s the other side of the room with most of the layout parts in place. What a mess!

Step 3. Priority One was setting up the new den. I got the throw-carpet over, cleaned the sofa, and got the TV all set up (this is the TV with the Wii, so it was important to get it set up and working!). My daughter Kirsten helped me with most of these tasks. Here she is earning her allowance.

Below. Here’s the wife, oblivious to the mess and mayhem around her. She is a patient woman…perhaps indifferent. I can’t tell.
By this time, around 5 p.m., 99% of the layout stuff has been moved over.


I spent another hour or two later in the day organizing and cleaning. One of the first improvements I made to the layout was to raise it a few inches, which is easy thanks to the Ikea sawhorses I use to support the layout. See the photo above. I just pinned the top board up two inches and tightened everything up with the wing nuts in front. This Ikea stuff works great.
Below. I set up the north side of the layout to check the new height and clearances. So far, so good. And there’s no chimney in the way.

Next: I will leave the layout disassembled and remove the backdrop and fascia for some detailed scenery work.
Doing something like this takes a lot of effort, but I find it good for renewal. I had a long list of “to-do’s” before moving the layout, and moving the layout identified more problems that need to be addressed. Now that the layout is in pieces and I can work on those problem areas from all four sides. I’m excited to get some good work done.
Here’s the short list of To-Do’s:
- Raise the layout 2-3 inches
- Raise the fascia a few millimeters to cover the highway crossing
- Build a box to house all the NCE, transformers, and power strips
- Lower the height of the staging yard backdrops
- Simplify the staging yards (one track on south side, two tracks on north side)
- Build an overhead cabinet for car storage
- Improve wiring harnesses (use clip-harnesses instead of screw-type harnesses)
- Rebuild the workbench (run the staging yard behind, not through the workbench)
- Build a wiring box for all workbench wiring
- Build a station at the workbench for all recharging devices
- Need a 25-foot retractable hose for airbrushing
- Figure out where to put the cabinet and bookshelves!
- Organize everything–sell some models and parts not used
I want to get most of this stuff done quickly so I can get back to model-building for the upcoming St. Louis RPM event–which will be on 26 and 27 July in Collinsville Illinois.
By the way, our old St. Louis RPM website has died. The new one can be found at www.icgdecals.com/stlrpm.
– John G

Wow
LikeLike