

Merry Christmas! I hope you all and your families had a wonderful Christmas celebration!
My wife’s brother and sister and all their kids came to visit us in Germany for Christmas. We took them to Ehrwald, Austria for a week of skiing. It was a wonderful trip and we got back in time to celebrate Christmas at home. Below is a photo of my son, Jacob, at the top of the mountain at the Ehrwald ski area. The scenery here was spectacular in every direction and we practically had the entire ski area to ourselves.

I wasn’t able to do any railfanning on this trip, but we drove to Garmisch-Partenkirchen one day to ski and visit the Christmas market there. On the way we paralleled the S-bahn passenger line for a short time and Jacob was able to catch a photo of a snowplow at work on the line. It was moving the opposite direction but he did a good job shooting through the windshield as we zoomed by.

Informal Operating Session
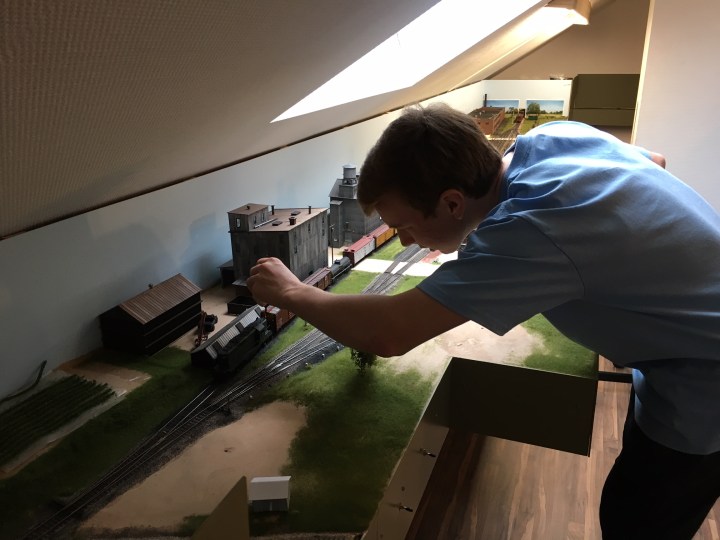
When we got back home on the 23rd, all the young boys came upstairs to run the trains. The little boys got their turns first. Here, below, Zuri is in the foreground at the throttle and Reid is getting a lesson on how to control switches and uncouple cars. I told Reid he was the conductor and the conductor is “the boss”. Zuri didn’t like that notion very much!

The little boys had fun and did well. I didn’t give them any lessons on switchology or how to run the trains; instead I just threw them at the layout and helped them at every step along the way. After all they just wanted to have some fun. Zuri was a more patient motorman and was respectful of the delicate models; Reid seemed to grasp the complexities of how to run a railroad a little sooner. They took turns being engineer and conductor and they had a good time.
Later that evening my nephew Stuart wanted to run so we came upstairs and I set up an informal operating session for him. Stuart is 15 so I explained what the layout represented in a little more detail , and I explained how to run the engine, and how to work the switches, and so forth. I served as his conductor. He did quite well and he enjoyed it. We ran for about an hour.
This morning Stuart asked if he could run the trains again so I got everything powered up and went over a few details, and then I left him alone with the layout. He ran for about two hours, moving cars back and forth to the industries, building trains in the staging yards, making mistakes, learning, overcoming, and enjoying the process.
Stuart is a very bright guy and I deliberately left him alone so he could have fun and learn on his own. Occasionally I would come upstairs and asked if he needed anything. One of the things I mentioned to him along the way was “It might be helpful to look at the layout as a two-dimensional logic problem” and I could swear I saw the light bulb switch on. At that point I went into a little more detail about how to run the railroad, and we discussed how to make a switching plan, how and why to use the two run-around tracks, and how to switch cars efficiently from both ends of a train.

After another hour I came back upstairs and built a few trains in each of the off-layout staging yards. Then I ran a few opposing trains at him, forcing him to stop his work and clear the main line so my train could get through. That threw a wrench into his logic puzzle, but each time–after my train left town–he got right back on the main line, rebuilt his switching plan, and got back to work. Smart kid.
Below. A short while later my son came upstairs, took the second throttle, and started running trains too.
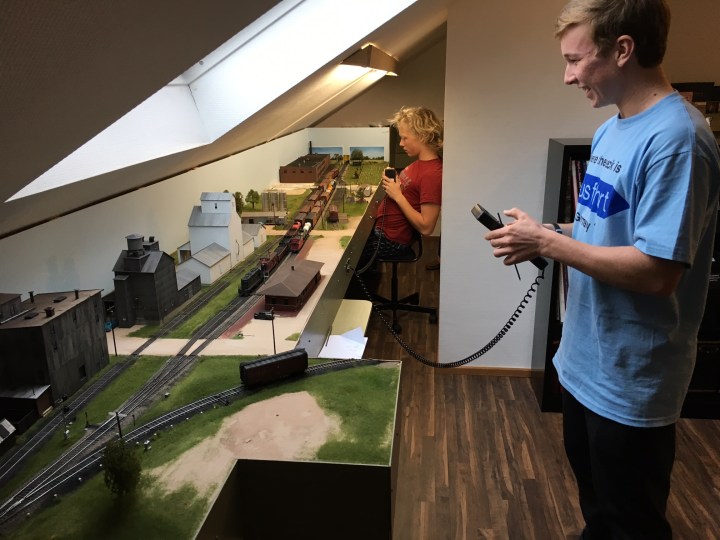
The boys had a good time learning about railroading but after a while things went downhill. My son talked Stuart into a train race and before I knew it they were racing RS-1s side-by-side on the main line and the passing track. The races were nothing like you’d see on old Top Gear episodes though–those momentum-equipped RS-1s are pretty slow starters. Anyway I left the room and told the boys “I’m leaving because I don’t want to know what you’re doing!” Jacob knows everything about the layout and I trust the boys enough to have fun without destroying anything.
I’m happy to report that the layout ran well with very few hiccups. One car had a coupler problem and was removed, one car had an apparent wheel-gauge problem (it seemed to derail in unusual places), and one of my Atlas RS-1s stalled a few times. I didn’t think the Atlas RS-1 was capable of stalling…
By the way, I had the kids run almost exclusively with a Proto GP-7 which was retrofitted with a Tsunami 2 DCC/sound system with Keep Alive. That engine runs like a dream.
The boys ran for over two hours today. I’m sure they will want to run again so when I get off the computer I’m going stage a few trains for another ops session.
Completing the Portage Tower Project
You may recall that I am building a few structures for Mike Moore’s new layout, which depicts the Illinois Central, Chicago Great Western, and Burlington lines in Iowa, circa 1965. A central feature of the layout is the junction of the three railroads at Portage, Iowa. Clark Propst and his crew of scurvy mates from Mason City built the layout and I offered to build Portage tower and some other buildings for the Portage scene.
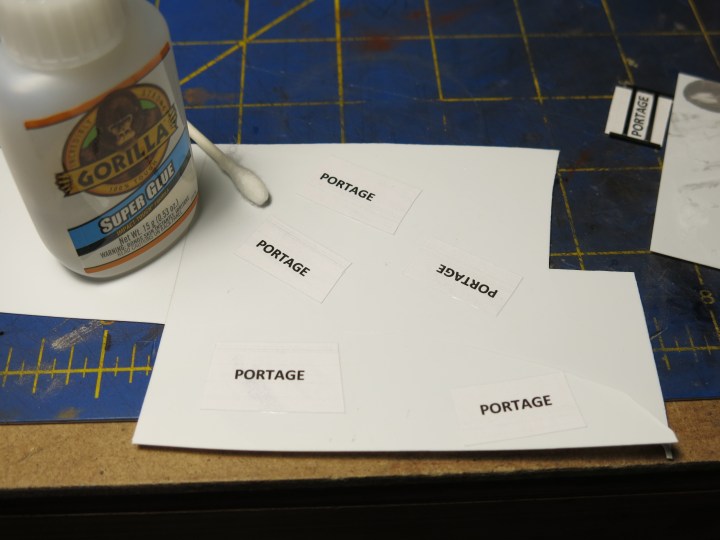
The buildings have been complete for some time but I had a heck of a time trying to complete station signs for the tower. I made three attempts and finally—on the third try, just before we left for our ski trip—I was able to makes signs that were acceptable.

I made the station signs by printing out the name of the station (I used Calibri font, 11-point) and gluing the paper to a .010 styrene back. The purpose for adding the styrene back was to provide some rigidity to the paper signboard. Then I built a frame made of styrene shapes around the signboard, and that was that.
The first step is shown below; I used a dab of Gorilla Glue, spread around with a Q-Tip, to secure the paper to the styrene.
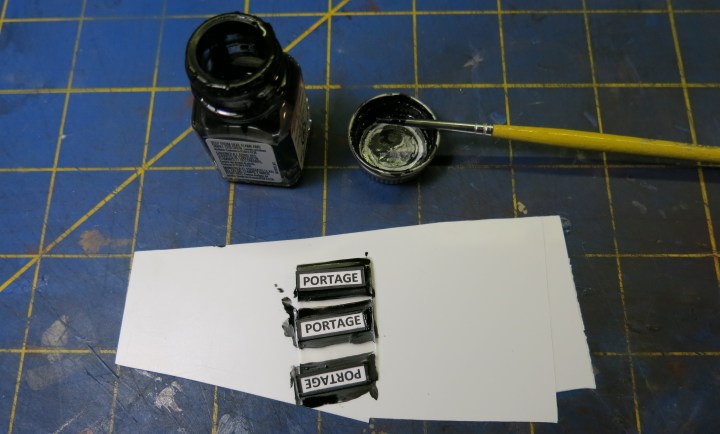
Next, below, I painted .010 x .030 styrene strips with Testors Black and applied them to the signboards. This was a whole lot harder to line up than it looks. I used heavier styrene strip on a few previous attempts and those signs didn’t look quite right.

Then I secured the completed signs on a piece of scrap plastic using tape, and painted around the frame on all sides, per the prototype.
When it was all dry, I the completed signs looked like this (below). They look a little beaten up, just like prototype signs do…although I didn’t do that on purpose…

The finished tower model isn’t perfect. I didn’t have time to add the screen door, the outside porch, and a few other details that were found on the real tower. The chimney isn’t quite right, and I did not add an any interior detail. The model captures the look of the prototype, and the tool houses that I also built will add a little interest to the scene. It was a fun project and Mike is a great guy and a good friend and I’m honored to be able to contribute something to his dream layout.
May God bless you and your families this Christmas! – John G

Merry Christmas, John:
Nice job building the tower and signs…you are quite the crafstman and I know Mike will appreciate them.
I admire your ability and patience in allowing your kids and nephews to run trains on your detailed railroad. Teaching those boys the basics and then leaving them alone to enjoy the hobby is an example for many of us to follow in sharing our railroads.
Thanks, for sharing the story and the pictures…they are always enjoyable.
Happy New Year,
Barry and Chris
LikeLike