


Back in November I was in Berlin for a ten day work trip and brought along a car kit to work on while I was there. I was fortunate to stay on the Berlin Hilton, and we had plenty of time after work to relax and do some sightseeing. I also brought along an old Sunshine Models Kit No. 91.16, M&StL XM-1 Box Car and a tool kit in case I had some spare time in the hotel. I completed the car easily in a few night’s work.
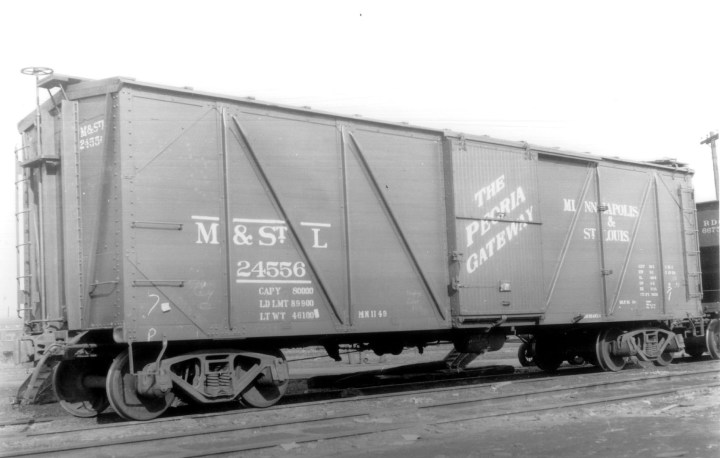
M&StL acquired a substantial fleet of single-sheathed and double-sheathed cars prior to the WWII years. Among those were 500 40-foot, 40-ton single sheathed cars built by GATC in 1930. These cars were placed in the road’s 24000-24998 number series; even numbers only. They were slightly different from the 1923 XM-1 design with an 8-foot, 9-1/2-inch interior height, composite ends, a slightly different underframe, and a truck-to-center-bolster distance of five feet. The cars were delivered with K brakes but got AB brakes after WWII.
Sunshine Models offered this nice HO scale model in 2003 and I was fortunate to acquire three of them. I think I bought this one from Clark Propst a few years ago at St. Louis RPM. The models are currently out of production but you can readily find them for sale on eBay or at RPM meets. The ultimate authority on construction details and photos is found in Railroad Prototype Cyclopedia No. 18, and I used it as my primary reference for building the model.
The two photos below shows one of the completed cars. I built this car in 2009.


I began this build by separating and inventorying the parts and sanding each part individually. This process usually takes me about an hour. Sunshine box cars normally consist of six major components: two sides, two ends, a roof and an underframe. I take great care in sanding all the edges, making sure both sides and both ends are sanded to the exact same length and height.
I like to build up the carbody one component at a time. In other words, I build up the underframe with all the brake rigging first, then build up the sides completely, and then the ends, and then assemble the basic car body. Finally I fix the roof to the model as the last major step. Then I complete final details like the last parts of the brake rigging, and add running board supports and other parts that overlap one or two of the major components.

The photo above shows the major components sanded and ready to build. Sanding down the small parts comes next–those parts are included in the resin “runner” on the right side of the photo next to the doors. I usually don’t use all those parts; in fact I end up replacing most of them. Look how warped that running board is. I discarded it and used a running board from a Speedwitch kit I had on hand.
The photo below shows basic carbody built up. This was a really fast and easy build as there were just a few holes to drill for grabs. The sides still need ladders and doors added, and the ends have a variety of details including grab irons, handbrake details, and other details that need to be fixed. I referred to RP Cyc the whole time to make sure I got everything right.
You’ve gotta love that fancy carpet underneath the glass desk top!

There is one additional thing that I take care to get right and that is to build the carbody as a perfect box with 90-degree angles with everything lined up longitudinally. In other words, I take care to make sure that the underframe is lined up and fixed in the center of the carbody so the rooflines and running board are perfectly centered on the track.
Cars that are not constructed properly in the longitudinal axis stand out in a consist, because they appear to be sideways, twisted–or “crab”–on the track. The running boards do not line up centered on the track, the couplers will be off-center, and so forth. There are a number of things that cause this, such as the running board not fixed in the center of the roof (a simple fix), or the trucks not drilled and tapped in the center of the car (a much more difficult fix). Slop in the axle length will also cause a car to shift to the left or right—that’s why it is important to use high quality trucks, like those made by Tahoe Model Works for example, with the correct Reboxx Code 88 wheelsets with the correct axle lengths. That alone will eliminate many tracking and longitudinal axis issues. Nobody wants to see their beautifully finished models roll sideways down the line.
Other parts used include a Cal Scale brake gear set, 40-ton trucks from Tahoe Model Works with Intermountain Code 88 wheel sets, Kadee #178 semi-scale couplers in “scale” coupler pockets, Hi-Tech air hoses with brass fixtures, A-Line stirrups, and plenty of scale wire, chain and Evergreen strip. Next comes sandblasting and paint.

Above. I enjoy looking at unpainted cars because you can see all the work and extra parts and effort that has been put into them. A few years ago I was talking to my buddy Tony Sissons at a St. Louis RPM event; I had a number of cars on my display table that looked like this–built but not painted. Tony said “It’s a shame we have to paint them, isn’t it!”
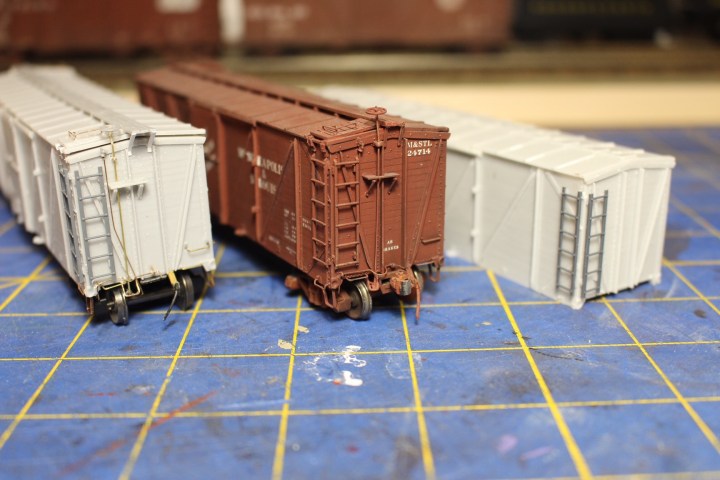
The photo above is poor photo but it shows the newly completed car at left with the built-up car for comparison. The third and final car at the right is under construction of course. More to follow when I get all three completed and on the layout. – John
