

After the styrodur subroadbed was laid and fixed securely to the layout frame, it was time to start laying roadbed and track.
I used cork roadbed exclusively because I like it. It is inexpensive, easy to get, comes in two pieces (essential for laying track on centerlines), stays in place with good glue, doesn’t swell, will hold spikes well if primed, and looks good. I can get it shipped from the US and I can get it here in Germany easily from a local dealer.
Before I laid any roadbed I set up the track on the styrodur surface and continuously refined the track plan until I was satisfied that everything was in the right place. This process took a few weeks, going over the location of the turnouts and industries until everything fit. I outlined this process in the MRP 2014 article covering the original Ackley layout.

The photo above shows part of the mock-up process before any of the track was laid. The styrodur is yellow, not blue like Styrofoam should be…but I really like the styrodur because it is a little more firm and easier to cut. In this photo you can also see where I drove a few screws into the styrodur to hold it in place while it was being glued to the benchwork.
I mentioned in an earlier post that I built the whole layout around the depot platform. That’s not entirely true, but it’s close. The depot platform was custom-made for me by Bill Hoss of Lake Junction Models in St. Louis. Because the platform was built on a broad curve, I couldn’t find or scratchbuild an off-the-shelf platform that met my needs. So I traced the track plan on a large piece of paper and sent it to Bill, and he laser cut the platform to fit. It even has a curved brick pattern like the prototype, and curbing on the ends. Bill delivered a truly beautiful scale representation.
Naturally I wanted to use the platform on the new layout so I built the entire track plan on this layout around it by placing it on the layout first and matching the curve to the platform, and adjusting the mainline on each end from there. The photo above shows how the platform was put into place and the broad curve in town was planned around it.

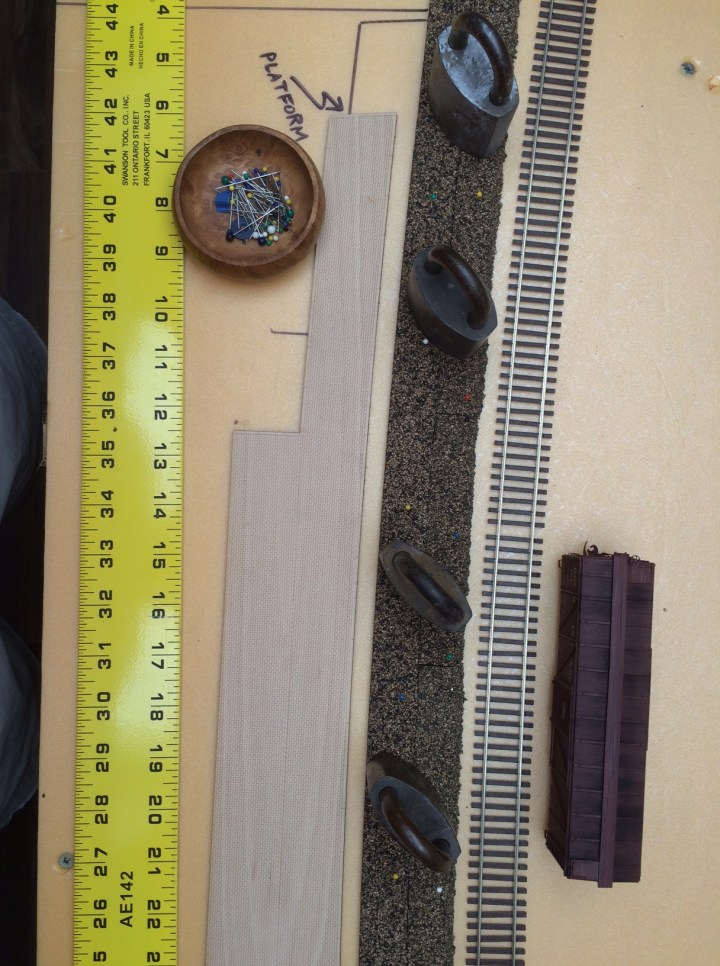
I started laying the roadbed beginning with the main line track through the depot area. See the photo above. I pinned the platform exactly where I wanted it and marked the centerline of the main line on the styrodur. This is one of the advantages of using cork roadbed, of course, as you can draw a centerline and lay track on it accurately. I make liberal use of my wife’s sewing stick-pins for this process.
Next, I laid a bead of glue for one half of the cork roadbed only, then fixed half of the roadbed down and adjusted it as the glue dried.

Once the roadbed was in the right place, I pinned it down with stickpins and then secured it down with old railroad locks. I slowly worked my way down the mainline, laying half the roadbed all the way across the 16 feet of visible layout. Love that broad curve through town!

I used Elmer’s white glue to bond the roadbed to the styrodur. In the past I have used Elmer’s glue with good success bonding cork roadbed to wood subroadbed, but in this case the styrodur did not hold the roadbed down successfully.
I found that the roadbed would stay secured by painting over it with standard US water-base household paint, which is why the roadbed is green in some of the photos. Later I primed the styrodur with the green paint first, and this helped the white glue get a good bond with the roadbed. Later still, I used a different glue called Kleben that I bought at the local German hardware store, which is really strong stuff. I just glued the roadbed down on the styrodur without priming, and that worked well…and spared me all the extra painting and paint mess.
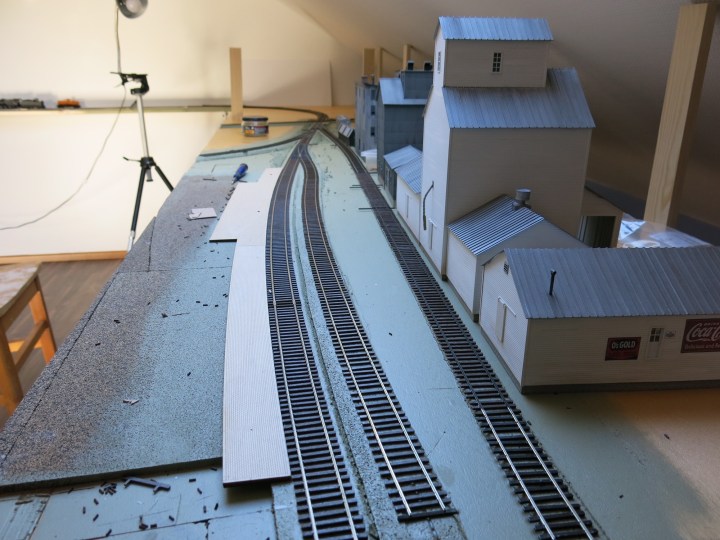
I’ll let the photos speak for themselves. The photo above shows the roadbed laid and sealed, with track mocked-up to make sure I got everything right. I used one layer of HO roadbed for the main track and N scale roadbed for everything else. I used a rasp to shave down the HO roadbed to the N scale thickness and that worked out just fine. The station platform and parking area also consists of one layer of HO roadbed.
Below. Throughout the roadbed-laying process, I continuously mocked-up the major features of the layout to make sure I was doing everything right. That took a lot of time but this helped me make sure I was on the right track so to speak..

Until next time…
