

In June I committed to some significant model-building projects for a friend–a Nickel Plate 1937 box car, one or two Wabash composite gondolas, and maybe a few more freight cars as time permits.

To make room for the new work, I’ve been working hard to clear a large lot of almost-completed models off the workbench. Here’s what’s new and finished.
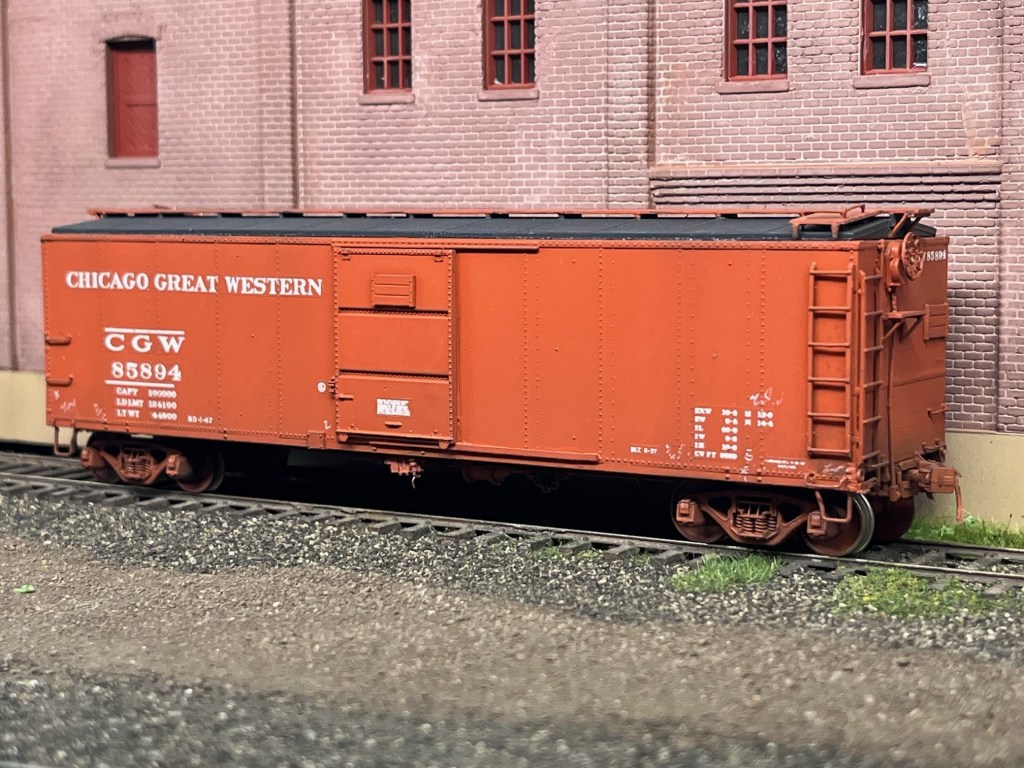
CGW Box Car
The first car finished was this ancient Red Caboose box car. I built up the model last fall and left it sitting on the shelf, 95% done, for about five months. Below is a photo of the original unwrapping–the Unboxing Experience as some folks say on YouTube.

My inspiration to add this model came from Fenton Wells, who built a similar car last year and told all about it on the Plastic Freight Cars site on Groups.io. I bought this one online…and imagine my surprise when I discovered the kit came with the correct “reverse CRECo” doors. I thought I was going to have to scratchbuild the doors. How do you like that!

Below. I built the model per the instructions but changed a few things to improve the details. I installed my own running boards using Evergreen HO scale 2 x 6 styrene strip, and also made my own running board supports from .010 styrene strip.

Below. Here’s the car with the unique doors, a replacement bottom door guide and replacement route card holder installed per the prototype. The white dots are styrene rod used to fill in the holes for the PRR-type door guide. 30+ years later these are still beautiful models.

I replaced all the brake gear with Cal Scale AB brake gear kit parts, .015 and .020 wire, and miniature chain. The couplers are Kadee #178, trucks are Tahoe Model Works Dalman with semi-scale wheelsets, and I also added Hi-Tech #6040 air hoses with brass fixtures. I mixed up my own matching paint with Tru Color Oxide red and a little freight car brown. Weathering helped blend the different colors together.
At some point in the finishing process I realized that I needed to remove the CGW monogram right of the door. Eventually I sandblasted the factory finish and repainted the model with the same Oxide Red/Brown mixture mentioned earlier, and applied decals from K4. That held up finishing the model for months. Blasting and repainting the car added a lot of time and unnecessary work, but I’m happy with the results.

Below. Here’s the finished car on my Hermitage Road layout. Fenton showed some research that these cars had black roofs so I followed him in kind and painted mine with a black roof too. I think it makes the car look a little better. Chalk marks were added with a white Prismacolor pencil, and the car was weathered lightly all around with AIM weathering powders. I use a large, flat brush with just a little bit of powder and work slowly. A light shot of Dullcote sealed everything and completed the finish.
Aside from the sandblasting and repainting, this was a fast and easy project and a lot of fun. It is a “fleet car” as I call it–I’ll keep it aside for run-through trains when I build a bigger layout.
RI Single-Sheathed Box Car
Within the last month I also finished this Sunshine Models Rock Island box car. I received this model from the Larry Sexton estate. This car sat finished and painted but not decaled for about five months.

I forgot to take any photos of this car under construction. Those photos are always instructive for showing what aftermarket details were added. On the underframe I added a Cal Scale AB brake gear set, Tahoe Model Works trucks, and Kadee #178 trucks. On the roof I used Evergreen styrene HO scale 2 x 6 strips for the running board, Evergreen .010 strip of the running board supports, and Yarmouth parts for the longitudinal running board supports. I finished the sides and ends using the kit parts except I added Hi-Tech #6040 air hoses with brass fixtures on each end. The photo below shows the car after painting with Tru Color Rock Island Freight Car Color.

Below. Decaling in progress. For the Rock Island car I used the kit-supplied decals exclusively. I used Walthers Decal Set because it’s a little stronger, which is necessary to get the old, thicker Sunshine decals to set between the side sheathing.

Below. A view of the underframe with Cal Scale AB brake gear fitted. I forgot to install the gussets on the cross bearers, and just left them off because I didn’t want to take all that brake gear off to refit the model.

SAL C1
Below. This SAL C-1 covered hopper was another “quick” project that took me two years (!!!) to finish.
The model in question is in front, below–SAL 8066. It’s an Intermountain car that came to me as an M&StL car. I sandblasted and repainted it to represent an early SAL hopper. I mixed my own paint color using Tru Color gloss paint, and decaled the painted car with a K4 decal set. The only replacement parts added were Hi-Tech #6040 air hoses with brass fixtures. I think I’m personally keeping Hi-Tech in business.

Above. I finished the new car in front, SAL 8066, before realizing that the prototype SAL cars had top doors that opened longitudinally. See the older model in back, versus the new car in front? The old car has the top loading doors in the correct configuration.
Incidentally, if the old car looks a little different, it’ because it was totally rebuilt from a Bowser car in 2007 while I was attending an Air Force school in Montgomery, Alabama. It’ still looks alright.’s still good enough to keep.
CB&Q 170155
CB&Q 170155 is one of the new Broadway triple hoppers. It came to me as a factory-painted MoPac car. The carbody details are excellent, but I found that the grabs on the sides and ends didn’t line up. I’m way too OCD to live with that, so I changed out all the grabs and wire parts and replaced them with Tichy grabs which are slightly thinner, and installed Tichy nut-bolt-washer details. I also added Tahoe Model Works double-truss trucks with semi-scale wheelsets, wire uncoupler devices, top chord gussets (another Tichy part, and Kadee #78 scale couplers.
After I replaced the details I sandblasted the model, and painted the model, to include the trucks, with Tru Color CMO Freight Car Red. I love the color–I think it looks like a slightly-weathered CB&Q brown. I used decals from Jerry Hamsmith. I used Testors Dullcote for the finish coat but put on a little too much, and the finish turned a little thick as can be seen below. I weathered the car with AIM weathering powders and which fixed the finish perfectly.

Photos don’t lie. In the photo above I can see that a few of the NBW castings were applied sideways. I need to fix them. Photos don’t lie!
Below. Here are some of the weathering powders I used to finish the car. I lightly–very lightly–brushed on black and various shades of brown to weather the car. The rust color in front, with some black, was used to weather the interior.

Proto48 NYC Hopper
I bought this model at the Lombard O scale show in March. I can’t afford a lot of O scale brass, so I’m using this car to augment a few inexpensive Intermountain USRA hoppers.
This model came to me as-new and unpainted. I gave it a bath in lacquer thinner to remove the finish, then painted the model with Scalecoat 1 gray primer. That took a week to dry. Then I painted the final color, Tru Color NYC Freight Car Color, and waited–I don’t know, maybe 45 minutes–for that to dry. I also painted the Protocraft ARA trucks with the carbody color as well.

Below. I decaled the model with decals from Resin Car Works (www.resincarworks.com). To make them fit I had to completely cut them apart and apply the numbers one by one–including the weight and capacity data. Each side ended up taking about 90 minutes to decal. This was another easy project that took a long time to finish.

Below. After the model was decaled and dullcoated, I weathered it exclusively with AIM dry weathering powders. I used Soot Black, Delta Dirt, Light Brown and Rust, in some cases mixed to tone down the colors. I took my time with the powders, weathering both the inside and outside surfaces with black and dark reds. I think the effect is excellent. I sealed it with Testors Dullcote.

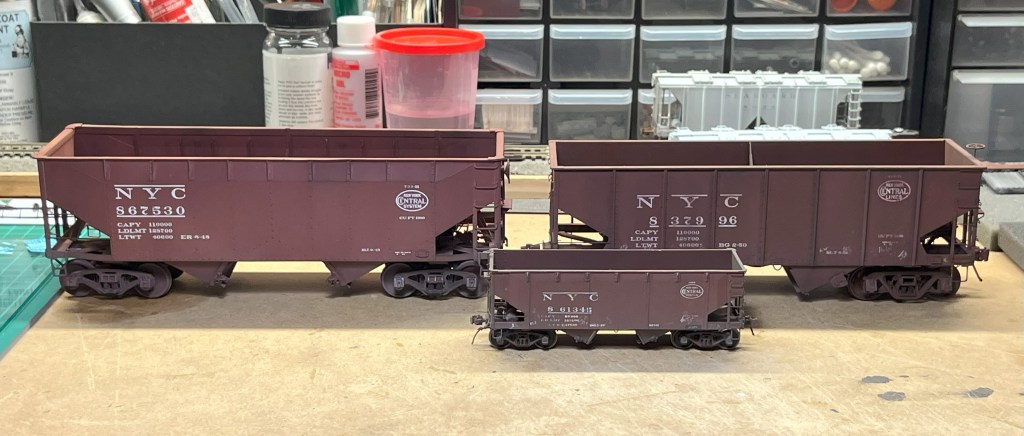
Below. A fun photo of three Central hoppers in two scales. Kinda looks like parents with their kid, doesn’t it? The new Precision Scale car is at the back left, an Intermountain model is at back right, and in front is a Tichy car with the Sunshine mini-kit applied to the sides.
Before the new work begins I also want to finish the last couple of structures on the little Hermitage Road switching layout. Progress is coming along slowly on the Block Company–here’s the latest view below. The signs are on, and some details are added. I want to add an overhead crane and a lot of broken blocks trackside.

It’s been a good summer so far–not too hot, plenty of rain. In fact, record cool summer temperatures in St. Louis and other parts of the Midwest. St Louis RPM was fun. I have a couple of trips coming up in August with some good hobby time built in. Then comes the Indy O scale show in September and Naperville in October. I’m looking forward to a productive modeling season and I hope you are too. – John

Please share with me the media that you use and the air pressure you use to sand blast the models.
Fred Rawling
LikeLike