The day before I left Germany for St. Louis RPM I drove south about 45 minutes and went to the West Wall Museum in Pirmasens, Germany. The West Wall was Germany’s post-WWI reply to the Maginot Line, and it was vast and extensive. The museum is essentially the only remaining tunnel system from the West Wall (most of it was demolished after the war) and it includes all kinds of memorabilia and equipment, and a large number of vehicles, and a lot of outstanding 1-to-35 scale models of the former facilities.
Here are a couple of pictures if you’re interested. This 1-35th model shows how deep the West Wall fortifications were in some places. A very well-done model. There’s a railroad prototype model at the bottom of this thing too.

Here’s a model of one of the fortifications.

Below is a Panther “Turm” (German word for turret). I learned that fixed Pantherturms were used extensively on the West Wall.

Inside the museum there were A LOT of vehicles. Many German, many American, and a few Russian and British vehicles as well. Here is a late-model Sdkfz. 251 towing a Russian 76.2 mm anti-tank gun. There were several 88s inside but my phone died and I only got a few photos.

And now some railroad modeling.
Lighting my little 16 x 2 layout was an afterthought. One part of the layout is lit by a skylight and the other half is hidden behind a chimney vent, which makes that part of the layout appear very dark.
I was part of an online conversation recently with Mike Skibbe and Frank Hodina a few other guys, and the topic turned to lighting layouts and workbenches. Frank mentioned that he had recently replaced his old T-12 fluorescent lights with a new LED replacement bulb made by Philips. He said he got a 10-pack from Home Depot for about $70, or $7 a tube–which is cheap for LEDs.
Frank mentioned “To simulate daylight we need a light color temperature in the range of 5000k to 7000k. Daylight with a thin overcast sky is 6500k–a bluish, white light. 6500k lighting brings the sun inside. Blues are blue, greens are green and steam engines can be painted black while still seeing the details.” Thus the new 6500k LEDs should be just right.

Above. One of my motivations for good lighting has always been this picture, which has Clark Propst at left and Bob Gratelliat (I know I just slaughtered your name, Bob!) working on Jason Klocke’s CGW layout. The lighting is what really caught my eye.
Mike Skibbe mentioned that he was using linkable LED fixtures for his workbench and the pictures he showed of his workbench looked great. He sent a link to the bulbs:
https://www.amazon.com/gp/aw/d/B012ENR1IE/ref=yo_ii_img?ie=UTF8&psc=1&th=1. Eric Hansmann said he uses a Torchstar product that found on Amazon which is linkable, a low profile, and has a very even light. These lights can also be found on Amazon at https://www.amazon.com/dp/B01A87NQ96/ref=cm_cr_ryp_prd_ttl_sol_2.
Armed with this motivation I went to my local Obi home improvement superstore and found low-profile, 4500K LEDs for just 23 Euros each. I could not find a 6500k bulb and I don’t think anybody is going to ship them to me here in Europa. Then I went to the wood shop at the air base and built up a very low profile valance system that I could mount on the sloped wall above the layout.

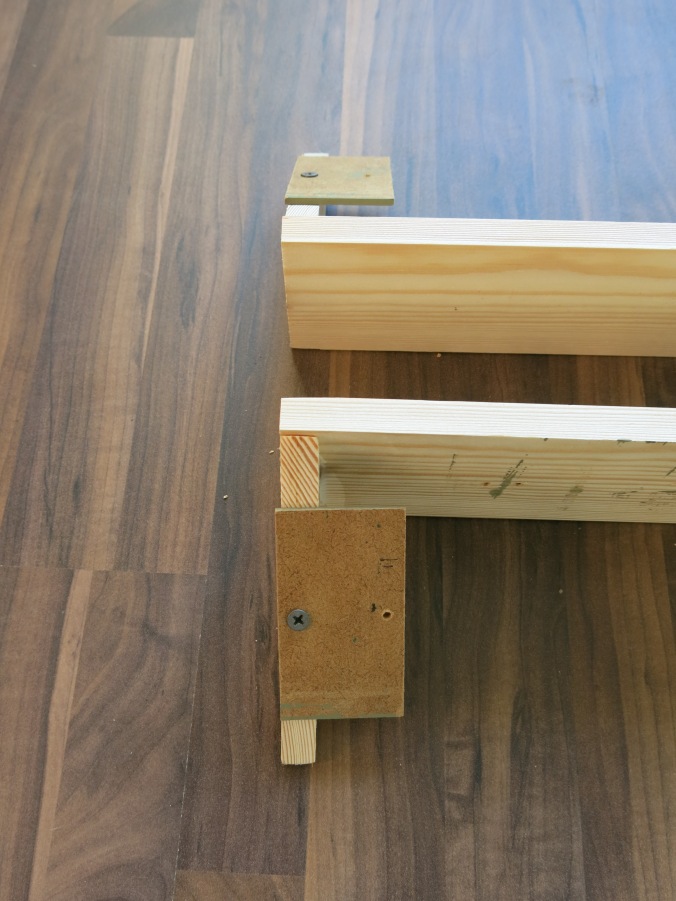
I used a piece of 1 x 4 pine and attached a triangular piece of wood on each side that matched the slope of the ceiling. I attached a Masonite pad on the slope to I could easily attach the whole fixture to the ceiling. I built the valances a little over four feet long because the LED lights are almost exactly four feet long. Below is a close-up of the corners.
My son helped me install the valances on the sloped ceiling. You can see how dark the layout appears behind the fireplace vent.
I installed the valences a little outside the edge of the layout to try and get more light under freight cars and buildings and so forth. I don’t want lighting straight overhead.

Jacob also installed some conduit and wired everything up for me. Below. Yes, Jacob is using my Chopper to cut conduit…

Below. Jacob is hooking up the conduit and getting everything looking good.

Below. Here’s a first view with the lights on. I plan to add a Masonite strip along the outside of the valance, painted green to match the layout and make it all match. Here they are in position.

The bad news about the installation is that there is some stress on the light cords and it is pulling the conduit off the ceiling, so it often looks like this:

The good news is I can take decent model photos without dragging over any additional lights. Here’s an example:

The 2 LED fixtures cost me 45 Euros, and lumber cost me about 10 Euros, and the wood shop fee was five US dollars. I also had to buy a little conduit and a German extension cord–that was another 10 Euros. To get this far cost me the equivalent of about $75 US. It’s not 6500k as Frank recommended but I think it’s great. – John

Looks like a museum I’d love to visit.
I’ve really enjoyed your progress and the new lighting looks great! I’d be tempted to paint the valance to match your ceiling color, only because your layout seems pretty open for a shadowbox type effect.
LikeLike
Hi Chris, thanks for writing. Yeah, it is a cool museum. There are some online critiques that are not very flattering but I found it definitely worth a couple of hours. There is a ton of stuff in there, including a train that used to run on the tracks in the tunnels. It was terribly cold down there too, and there I was in shorts and a t-shirt. Lots of models, weapons, memorabilia, vehicles, dioramas, and a lot of paper documents on display. Wish I could get into that Panther turret.
Thanks for the comments about the valance. I’ll do a little testing with the colors and let you know how it goes. You make a good point about the layout being open–it might look goofy to paint the valance green. It might create a shadowbox with no ends.
LikeLike
John
I think the lighting looks great. If your photos are showing the lighting in such a favorable way I’m quite impressed. I’m just starting in designing my new home layout and will most definately be going with LED bulbs.
What did you use to take the photo with? DSLR camera or iPhone ?
Lee Stoermer
LikeLike
Hi Lee, thanks for writing buddy. Yes, that box car photo was ta6500ken using the new light fixtures. Nothing else added. I wasn’t able to readily find 6500k bulbs but I admit I didn’t look very hard. I was looking for something slim and LED. That photo was taken with my little point-and-shoot Canon G15. It’s not too fancy. My son’s iPhone 6 takes MUCH better photos. I swipe it from him every once in a while and take photos all over the layout. So you are planning a layout? What are you going to model? I’d be interested to hear your plans. John G
LikeLike
Hi John
I’m currently in thought process mode of designing my layout. I’ve recently moved to northern Virginia and am anxiously awaiting completion of the house over my railroad room. Hopefully end of August. Am planning on modeling the western Maryland and northern central Rr from the PA-MD state line towards York PA with a MPA branch out of york. Era is currently 1981 but have been strongly considering 1939. Single deck, maybe double. HO. I have one large room and possibly access/ use into another area later. I have some rough strong line ideas of LDE I want to incorporate but nothing firm until after this weekend when I can get actual measurements of the specific areas.
LikeLiked by 1 person
Hi Lee, good to hear from you! Tell me more about the layout space. I’d like to hear your visions, and what you’re doing to prepare the space for a layout. I’d start small and move out from there. The scenicked portion of my layout is only 16 feet but it has taken me quite a year to get it “finished” and I still have a long way to go. I probably have a lot less time to work on a layout than you do, but that might be a good rule-of-thumb: 15-20 feet of completed, fully-scenicked layout per year. I also have two small staging yards, each about 15 feet and those are completed. That’s quite a disparity in modeling eras too–wow! Maybe you should split the difference and model 1960??? – John
LikeLike
Yes the split in era is quite a gap. And splitting the difference isn’t an option I’m interested in. Either 1981 or 1939 give or take a few years. 81 because that’s what I remember mostly from early modeling and I like the per diem box car scene. and 1939 because a friend is modeling 1926 and showed me how much more opportunities related to switching and passenger ops I’d have but 26 was a bit far back and 39 seemed good with the ww2 build up. Plus that’s about the year the movie ‘A Christmas Story’ takes place ! I still can see Ralphie in his bed and hear the steam locomotive whistles in the background. …
So……. I’ve accumulated enough to run either era somewhat. I’ve considered modeling the 1939 scene wise but changing eras by changing rolling stock. Not completely accurate but hey, it’s mine:)
I have five scenes I want to model of the Northern Central/PRR line. New Freedom PA along with intechange of the Stewartstown RR. Then Hanover Junction which depend on era is either functioning or only becomes and old station point. Then on to York with interchange to the western Maryland and the Maryland and Pennsylvania railroads. I’d like to go to a second deck with WM going one way and MPA the other. Option 3 is focusing on WM MPA and NCRy/PRR plays a supporting role. Or even totally change history to that the B&O actually maintained control of the line instead of the PRR ,,,,,,,,,,
So lots to consider.
A couple pieces of infrastructure are important:a layout design elements: Howard Tunnel, which is the only tunnel on the line, the stone arch bridges found all along the route on that area, some street running of the mainline through york and the several unique structures. These include the stations at new Freedom and Hanover junction , octagon shaped switch towers and the numerous bridges.
Layout wise I’ll have to measure for exact but have an area about 16 x 25′ in either of two rooms with an adjoining area as a shop/ work space. One 16-25 area is an unfinished area. The other is complete finished. I can readily handle finishing it as needed.
Well about it so far
Lee
LikeLike
Yes the split in era is quite a gap. And splitting the difference isn’t an option I’m interested in. Either 1981 or 1939 give or take a few years. 81 because that’s what I remember mostly from early modeling and I like the per diem box car scene. and 1939 because a friend is modeling 1926 and showed me how much more opportunities related to switching and passenger ops I’d have but 26 was a bit far back and 39 seemed good with the ww2 build up. Plus that’s about the year the movie ‘A Christmas Story’ takes place ! I still can see Ralphie in his bed and hear the steam locomotive whistles in the background. …
So……. I’ve accumulated enough to run either era somewhat. I’ve considered modeling the 1939 scene wise but changing eras by changing rolling stock. Not completely accurate but hey, it’s mine:)
I have five scenes I want to model of the Northern Central/PRR line. New Freedom PA along with intechange of the Stewartstown RR. Then Hanover Junction which depend on era is either functioning or only becomes and old station point. Then on to York with interchange to the western Maryland and the Maryland and Pennsylvania railroads. I’d like to go to a second deck with WM going one way and MPA the other. Option 3 is focusing on WM MPA and NCRy/PRR plays a supporting role. Or even totally change history to that the B&O actually maintained control of the line instead of the PRR ,,,,,,,,,,
So lots to consider.
A couple pieces of infrastructure are important:a layout design elements: Howard Tunnel, which is the only tunnel on the line, the stone arch bridges found all along the route on that area, some street running of the mainline through york and the several unique structures. These include the stations at new Freedom and Hanover junction , octagon shaped switch towers and the numerous bridges.
Layout wise I’ll have to measure for exact but have an area about 16 x 25′ in either of two rooms with an adjoining area as a shop/ work space. One 16-25 area is an unfinished area. The other is complete finished. I can readily handle finishing it as needed.
Well about it so far, I really need to get some accurate measurement. Hopefully tomorrow morning I can.
Lee
LikeLike